Sunday, May 30, 2010

I'm Just Walkin'


I've been following an interesting adventure of one man's walk across America that I thought I'd share. His name is Matt and he's pushing a little cart that is loaded with all his gear from New York to Oregon. The best part is that you can closely follow his adventures as he updates his website via a smartphone, sometimes several times a day with the photos of the people, places, and his other experiences so you're never more than just a few hours behind him.

You can find him at his website I'm Just Walkin' . Just click on the sidebar calender to get caught up on his journey then you're on your way. A good interview about his journey can be found on John Greenfield's blog.Matt meets kindly folks along the way who let him camp in their yards, fields, or barn and sometimes right in a real bed with a nice hot meal to boot. He also has an ongoing roll of awesome mailboxes along the way which are quite interesting. Matt is a great writer/photographer and you will quickly get addicted to his descriptive captions which tell his story well.

I've always been interested in the adventurous pursuits of others since I've had a few of my own adventures over the years and I'm especially interested in common people that do extraordinary things.Give him a visit. Who knows; it might be you out there looking for adventure one day!

Saturday, May 29, 2010

A Woodshop Class That Changes Kids Lives

 I always like finding another school woodshop program that is changing kids lives for the better. Below is a short video that highlights the woodshop class run by teacher Brett Smith in Phoenix, Arizona at Valley View Elementary.

The unique thing about this program is that the kids are working hard making things that the school needs. They are currently working on a 2-1/2 year project for improving the school's library with bookshelves, magazine racks, cabinets, and you name it. Most woodshop classes seem to focus on having the students work on personal projects, which is great, but at Valley View the kids are learning the enormous rewards and gratification that result from helping others. The kids in this video are not only learning how to use their hands as a life-long skill, but they are also being taught a huge lesson in character. Just take a look for yourself...


According to woodshop teacher Brett Smith, "the kids are learning to solve problems everyday and the idea is to have that problem in front of you and then solving it."  He goes on to say that, "the kids come back the next year trying to get back in woodshop class. The work is hard but I think that they do appreciate it." I would have to say that this is an under-statement because from looking at the video, it's apparent that Mr. Smith is changing these kids lives for the better.

Some of the kids comments verify this as their newfound skills of working wood has helped build their family relationships: "I find that this class is a way for me to work with my dad when he doesn't want to be alone." and another student says, "When my mom doesn't know how to do something I can help her and other family members." Woodshop class has had a direct and positive effect on these kids self worth, character, and as a means for building stronger families.

Once again, the unique thing about this woodshop class is that they're building useful things for their own school. One of the kids in the video summed it up perfectly when he said both candidly and honestly, "When people visit we say 'Yeah'... We made that!" I can't imagine a more powerful life lesson that that.

Wednesday, May 26, 2010

WIP: Carving Totem Sticks Re-Visited (part 1 of 3)

WIP= "Work in progress"

I've been in the totem pole carving mood lately. 2010 has already brought on several totem carvings, all the way from a 16 foot pole down to a 2 foot table totem. As seen in the picture to the right I haven't tackled what I call a "stick" totem or perhaps a "limb" totem for about a year now.

These little totems are one of my favorites because it provides the golden example for making something from nothing. Yes, basswood is wonderful but still nothing thrills the depths of my carving psych more that to pick up a fallen limb after a wind storm then carve up something for posterity to examine. Rescuing it from the forest floor a certain tree limb, in this case a tulip poplar, would now have the opportunity not to rot back into the good earth, but perhaps become a wonderful admired object. Nothing thrills me more than found wood carving.

Although the first picture above shows the design that I first sketched on the stick of a Thunderbird on top, a duck in the middle, and a master builder on the bottom... the first step in prepping the stick is sawing it into four sides. As you can see in the picture to the left I flared the bottom of the stick outwards which will provide a built-in stand when completed.

I might add that you should exercise extreme caution when cutting any round object such as a found tree limb on the bandsaw. Doing so without proper support could result in not only a ruined piece of wood but the increased likelihood of severe bodily injury. Please exercise extreme caution when selecting a method for cutting a rounded tree limb because your safety is my ultimate concern.

As seen in the picture to the immediate right I also used a piece of the same limb to saw out a 5/16" thick 2" X 6" block that I will use for the Thunderbird wings. Notice that I have also notched out a tight fitting slot to fit the wings into later on when all of the pole carving is done. For right now it's a lot easier to carve without the wings attached. The measurements for the body of the totem stick is 9" tall and the "square" of the pole is 1-1/8" thick.
Looking at the picture to the left I started this totem at the top with the Thunderbird. This mythical bird of the Indians is one of my favorite to carve with it's tuft of feathers rustling in the wind above it's little head. I had some fun with this bird and curved back his beak on both sides in an arc that went most of the way to the rear side. I used my little palm u-gouge to pluck out the breast feathers then went on to make various decorative cuts over the entire body and I just let the "Great Spirit" guide me as I went. No patterns, no pictures... I just let my hands do the thinking. That's relaxation at it's best!

I'll post another update soon.

Sunday, May 23, 2010

2010 Spring Fellowship @ Camp Raven Knob...and a New Arrowman

Last weekend was Spring Fellowship for Order of the Arrow's Wahissa Lodge 118 at Camp Raven Knob where several hundred Arrowmen met for a weekend of cheerful service. The main focus was setting up tents in all the campsites preparing for summer camp that begins in just a few weeks.

This was a unique weekend because there was an unannounced Ordeal going on at the same time where 4 new candidates were participating in a 24 hour ordeal to be Arrowmen in the OA. As seen in the picture to the left, today I just completed decorating the arrow worn by one new Arrowman which I hope will be a long-time memento as he grows into a man during the coming years. If he can somehow hang on to it for 40 or 50 years, one day it will have significant meaning in a way unexpected far down his path in life. I woodburned his name and date of the Ordeal on the rear side of the arrow so that he'll never forget and I'm anxious to present it to him in a couple of weeks.


The picture to the right was taken just after the OA ceremony and if you look closely, the wood arrow that was worn during the 24 hour Ordeal is hanging around the neck of the new Arrowman in the center. If you're wondering why he's wearing a buffalo head dress then take a look at the other pictures just below.

The Indian on the left decided that it would be a great picture if the Scout was wearing his head dress so he put it right on his head and what a great picture that this will be for his scrap book! Although the ceremony where a Scout transitions into Order of the Arrow is quite secret, I can assure you that it's very impressive. The ceremony is usually held at a special spot deep in the woods but due to a violent hail storm this afternoon, we had to move it inside near a fireplace "campfire".


Throughout the weekend we had a great time of fellowship and cheerful service as Arrowmen worked together in cheerful service to prepare Camp Raven Knob for the 2010 session of summer camp. The various chapters worked together in groups and in competition to set up the most tents.

It was like a well oiled machine as gear lines formed naturally to shuttle beds, mattresses, and tents into their proper place. A lot of laughter, jokes, songs, and highly spirited attitudes from everyone made the day a fantastic experience to remember.
Normally at spring fellowship there is a carnival that afternoon but a very dangerous hail storm kept everyone safely confined in their campsites. By 8:00p.m. the storm had passed and everyone met in the dining hall until near midnight for a CrackerBarrell which included good food, fun, patch trading, and as you can see in the picture to the left, Native American dancing is always a highlight.

Camp is now set for a successful summer session and Wahissa Lodge has gladly done their part again.

Friday, May 21, 2010

A Hands-On Lesson About Aerodynamics

It isn't every day that we end up in woodshop class. Working with kids that have various behavior issues, occasionally I must make the call to cancel class to ensure safety until the group is calm, cool, and collect.

This was one of those challenging days with one particular group but even when we can't use power tools I still make every effort to teach an alternative class with a hands-on emphasis. On a whim I suddenly had the idea of concentrating on a lesson in aerodynamics which, like working wood, is yet another great opportunity for powerful hands-on learning and even more it's a great opportunity to ensure quality time with kids. Yes, I'm talking about making an airplane from scratch then seeing it fly through the air. That's pure aerodynamics.

After grabbing some sturdy 2-ply cardboard from the trash pile I explained to the kids the parts of an airplane as I demonstrated how to sketch out and then cut the cardboard pieces. The fuselage, wings, rudder, and ailerons have always been some of my favorite subjects to talk about after learning to fly a plane back in the 1980's. More on that in a minute.

When the hands are busy and good stories are being shared it's amazing how the kids attention is dominated in
 learning something new and sharing their own knowledge with the class. Since getting the hands busy has a direct and positive effect on behavior I immediately got the kids busy cutting the slots in the cardboard as they found tight fitting parts that would withstand our experiments for a smooth flying plane.

After a good deal of measuring, cutting, and fitting it was time for a test flight. Everyone was anxious about whether the plane would glide through the air or crash fiercely into the earth. With an outstretched arm the plane was thrust forward and released... then plunged straight down into the ground. You might say that it crashed and burned. Right then someone blurted out to, "Lift up the nose and throw it upwards". Everyone thought that was a good idea so another launch was made. Once again it went into the ground with only a short trail of flight.

As seen in the picture above one bright student suggested that the front of the fuselage needed a little weight so I let him carve out a forked piece of tree limb to slip onto the nose of the plane. This ended up being a brilliant idea because the plane then had a near perfect straight path of flight. The kids solved the problems of flight, step by step and I didn't even give them any hints. A once canceled class ended up being a great lesson and with a lot of hands-on involvement the kids minds were at their best. The lesson went so well that I've decided to open up all of my Scout classes next week with this presentation.

As previously mentioned I learned to fly back in the 1980's as one of my life goals. I lived on the North Carolina coast at the time and about 75 miles south of Kitty Hawk where the Wright brothers first flew back in 1903. After a long work week I would always take the plane up for some stress free relaxed flying along the beach. I took the picture to the left on one of my weekly flights and that's the lighthouse at Cape Lookout that I've circled. Learning to fly changed my entire perspective about how I perceived the world around me and I love to share those experiences.

Wednesday, May 19, 2010

Wow! Blog's One Year Anniversary Today

Today marks the one year anniversary for my blog. In the beginning I wasn't sure where it would go but after a while it became a living part of my daily life . I was determined right from the beginning that my blog wouldn't take over my life in a way that was like "work". It would be a labor of love for sharing information about the things that I care about and nothing more.


Nothing to sell, nothing to peddle; just a means to get something out of my head that was screaming to be told. I refused to become a "slave" to my blog so if I suddenly lost interest, then there would simply be nothing to post  and without apology. Fortunately, I never reached that point and the blog hasn't dominated my life but rather it has enriched my purpose in life tenfold.

I love to share information, I love to write, and I love the art of creation... whether in the form of carving a piece of wood into a beautiful admired object or by crafting words and pictures together to paint the stories which flood my mind and beg to be written.

Looking back over the last 151 posts the most interesting discovery of this blogging experience has been the realization that I've created a "fingerprint" glimpse into who I am. Studying a blog is a great way to find out about what a person is all about and I believe that my blog presents that window for others to explore, learn, and perhaps in the process, become a better person. If you aren't blogging then I would greatly encourage you to consider it, whatever your interests might be. The stories that I choose to share are about the things I care about the most so it's something that comes out of my heart and not something that comes from being a slave to duty.

As the years roll by I'm sure that the "trails" in my life will continue to evolve and I hope that the direction of the blog will reflect those changes, whatever they might be. Thanks to all who have followed my postings over the last year and it is my greatest hope that what I've shared has added something meaningful to the quality of your own lives. Many Happy Trails!

Tuesday, May 18, 2010

Dick Proenneke: "One Man's Wilderness"

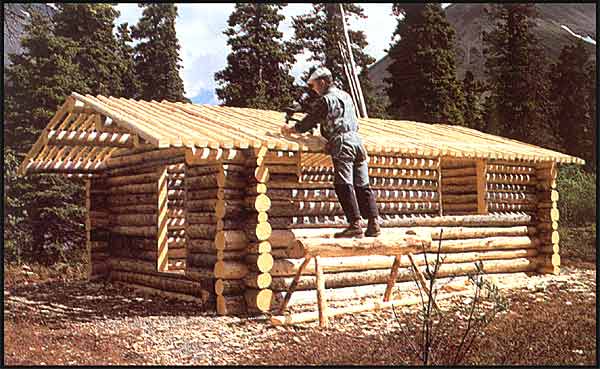
Looking at society as a whole, there is no other character trait that I admire more than a person who is determined to become his own person, even if it means grinding against societal norms. When a man decides that it's time to pick up what he owns and move deep into the Alaskan wilderness to live close to nature and to the land, to build his own log cabin home with his own hands, and to spend more than 31 years in that occupation, then there is no more kindred spirit to my own walk in life.

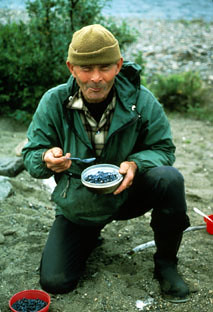
As seen in the picture to the left Dick Proenneke was one such man who at the age of 52 left everything behind to fulfill his life's mission. In 1968, when I was just 12 years old, Mr. Proenneke traded in his job as a master diesel mechanic to live the next 31 years in a log cabin that he built at the base of the Aleutian Peninsula, in what is now Lake Clark National Park & Preserve. At his death in 2003 Mr. Proenneke had willed his homestead cabin to the National Park Service where his legacy still lives on today.


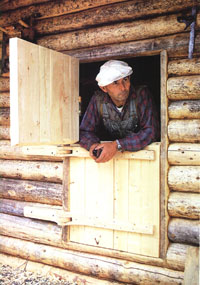
As you can see from the picture to the right, Proenneke is posing inside of his famous dutch door that has been the focus of many conversations among master wood workers for it's amazing craftsmanship. I have heard that making the trek to visit his cabin is worth the journey just to see the perfection in art of those wooden hinges and latch. One day I will visit and see it for myself.


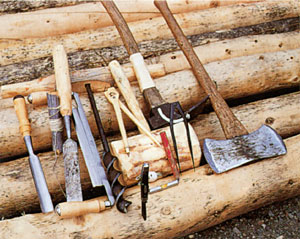
 Proenneke also fashioned many of the tools used to build his cabin as seen in the picture below. He was a master craftsman and spent much of his time on creating his own homemade furniture and devises that are a powerful reflection of his woodworking genius.


Fortunate for us Proenneke took the time to film the construction of his cabin, almost in a step-by-step manner as though he wanted to leave something of his experience behind to share with the world. In 1973 his friend Sam Keith edited a volume of his journal entitled One Man's Wilderness. In 2003 a documentary film, Alone in the Wilderness, was produced from Proenneke's recordings and it is often shown on Public Broadcasting stations.
To many, Dick Proenneke is thought of as a modern day Henry David Thoreau but there is one profound difference: Proenneke lived in his Twin Lakes cabin for over 30 years and Thoreau lived in his cabin on Walden Pond for just over 2 years. Not to diminish Thoreau because he did make a profound mark on American culture, but Proenneke has also made his own unique statement about life and living for men to ponder upon for many generations to come.


While living in an age where more and more Americans are looking to big government for the answers to their societal ills, it's refreshing to remind ourselves of the rugged individualism and self-reliance that can still be found by those determined to live their own lives. Proenneke lived those values which made America strong in the beginning and I only hope that they remain important to future generations.

The film below gives a small glimpse into the mind of Dick Proenneke which reminds us of the things that really matter in life.

Sunday, May 16, 2010

Carving Wood Bear Claws

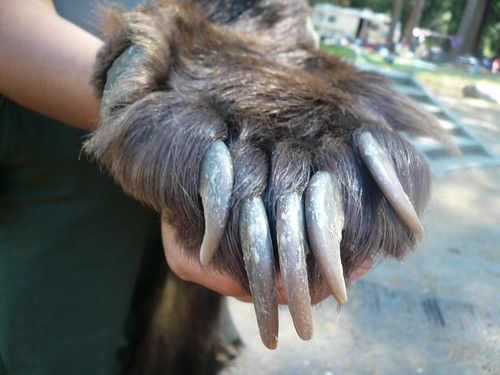
While at several recent Scouting events I've come across several people who had both real and carved wood bear claws, as necklaces, walking stick decorations, or just hanging from a string on a pocket. Bear claws have always caught my attention when used for decoration so I talked with a lot of these folks and they allowed me to photograph their claws.

About a month ago I began researching bear claws and the picture to the left shows my progress as I search in quest for carving my own bear claws.

From the tip of the claws root to the tip of the claw, they measure 2-1/4" long and I used basswood. As seen in the pictures to the right I first cut out the claws using a scroll saw then used my v-parting tool to separate the root from the claw, then proceeded to shape up the remainder with my jack knife.

After the initial carving I then applied a bit of dark maroon acrylic paint to the root of the claw, then used my propane torch to char the entire claw being careful not to actually catch it on fire.
I then read somewhere about running a project like this through clear candle wax so that's how I finished my first claw after lightly sanding it after torching. Looks like a pretty good finish to me but I'll be trying other options too.

 Although I haven't gotten that far yet, I would now like to carve several more claws and then work on making a necklace. I'm also thinking that they will also make a great addition to a walking stick wrist strap. Maybe one day I'll get some real bear claws like in the picture to the left, but until then I'm going with wood!

Thursday, May 13, 2010

Hands In Motion: Gateway to Working Wood


There's something about hands in motion that wields amazing power inside our minds. When our hands are engaged with a tool working wood there is no doubt about it; our demeanor is calmed, our head becomes clear, and our minds transition, almost without notice, into the creative right side of the brain. This is the point where working wood becomes powerful  therapy in our lives and I actually believe that it makes us better people whenever we can enter that almost "magical" side of working wood.


When my students reach a level in woodshop class where they're more independent, I see this occur all the time as they're hands become a conduit in harmony with their mind as they carve, shave, shape, or mold the wood into beautiful objects. These students have intense focus and it's hard to distract them when they've entered the gates on the right side of their brain where anything is possible. When it happens I'm usually the only one who knows what is going on and I just grin with satisfaction because I know that kid has entered a special place and is at peace if only for a few minutes. They don't ask questions, they don't look up, and they don't hear any distractions. Their focus is intense yet they are simultaneously relaxed and peaceful.

I can only hope that they will continue on a path of woodworking throughout their lives, long after leaving my woodshop class because I'm convinced that working wood can be a strong catalyst for making us much better  people in all that we do. I see it happen every day.

Tuesday, May 11, 2010

Flint Knapping: Centuries Old Hands-On Learning

As I have so often mentioned in many other postings, the Boy Scouts is a mecca of hands-on opportunities for kids to explore the connections between their hands and brains... an area that modern schools are failing miserably.

At two different Scouting events this spring I have found the craft of flint knapping and the lines of kids to try their hands at this ancient art are always long. It's one thing to find a nice arrowhead point while scouring the banks of a river, but to actually learn how the Native Americans made them hundreds of years ago is education at its best.
 To watch a skilled teacher of the art so precisely chip a raw piece of flint into a working tool is a joy to watch, learn, and absorb. As new "knappers" learn the ways of chipping their own stone while listening to stories about the living history of the people who once depended on this skill for their very survival brings full-circle an education more complete and more meaningful to a young mind than any classroom lecture could ever compete.

As you can see in the pictures to the left and below, one of the Scouts in our troop at a recent event quickly found himself enthralled with the flint knapping station where he learned how to make his own flint and obsidian points. Back in campsite he was very proud of his newfound skill and was showing off his two points. Not only did he learn a new skill but also a hands-on lesson that will stick with him for a lifetime, unlike any classroom lecture that he will ever endure.

The picture to the right is of me in 1983 while leading a 28 day canoe trip on Georgia's Ocmulgee-Altamaha rivers. During our four weeks on the river we taught the boys a lot about Indian culture as we dug daily in the rivers bank finding tons of broken pottery and chippings.

On one such dig I found the greatest point in my life as seen in the picture to the right of a perfect intact arrowhead. Even today it amazes me that another human being held this same stone hundreds of years ago. I still wonder who that person was and wish that I could meet him.

Classroom lectures are perhaps part of the equation in eduction, but when you're in the "real" world making dirty hands, listening to first-hand stories, while learning an ancient skill by chipping your own stone into something useful you are taking education to a new level. If you're trusting the educational bureaucracy with the education of your own children then they're probably being left behind at some level. Take matters into your own hands and get their hands "dirty" learning about the real world in a real way. The Boy Scouts is a good place to start looking.

Sunday, May 9, 2010

WIP: Carving A Two Foot Table Totem Pole- (Part 4 of 4)


WIP= "Work in Progress"

The totem pole is now painted, finished, and sitting on somebody's table. The only thing not showing in the picture to the left is the brass plate of recognition attached to the stand. I wasn't there for the presentation but was told that it was well received.

I used watered down acrylics for the paints, however all of the wood-colored areas is an oil based honey brown stain. After the painting was finished I sealed the entire pole with acrylic sealer, applied an antique wash of burnt umber, then lightly sanded it to accentuate the carving thus giving it a more hand-made look. The final sealer was a hand rubbed application of polyurethane.

Once again, from the top down is the eagle, raven, frog, beaver, and the bear.  If you'd like to catch up on the carving of this table totem, then check out these links from previous postings:


Thursday, May 6, 2010

An Intro To Basketry With Bonnie Byrum

I recently had the opportunity to attend a short basketry workshop with Bonnie Byrum who is a friend and supporter of Boy Scouting in North Carolina. The workshop was short but it was her goal to inspire young and older hands to the wonderful world of basket weaving and her enthusiasm was more than contagious.

A newcomer could be easily intimidated from browsing around at her magnificent collection of personal weaving but her helpful demeanor quickly put everyone at ease. On the table Bonnie had four containers holding red, yellow, blue, and green dyes with short reeds soaking in the mixture. Everyone was given four of the reeds with each color.

The reeds were wet and thus easy to work as Bonnie guided us through the weaving of a wonderful symbol that represented our membership in Order of the Arrow. As seen in the close-up pictures below the blue reed represented us. The red represented our lodge chapter, the yellow our lodge, and the green our section.
At first it was a little tricky to get a knack for the weaving but I soon caught on. Although the picture to the right doesn't show it, I later decided to trim the four reed ends to a shorter length and at an angle for more visual effect.

This was a wonderful hands-on activity and I didn't see anyone that didn't have a great time. We also left with a great craft and a much better impression for those who weave.

Monday, May 3, 2010

Old Hickory Council 2010 Centennial Celebration

Whether it was finding a way to get 20 gallons of fresh water to campsite from the water buffalo or lashing together a 3-pole tripod strong enough to support a swinging Scout, the Old Hickory Centennial Celebration last weekend was 100% pure hands-on activity from sun-up to sun-down. In an era when hands-on learning is disappearing from our schools the Boy Scouts continue to offer a quality program where a boy can feel secure and safe just being a boy... and boys like to build, saw, swing, hammer, and whatever else that is involved with action and activity. The Old Hickory Council made this opportunity available once again last weekend for 1,400 council Cubs, Scouts, Venturers, and Explorers where a lot of kids chose outdoor activity over brainless video games and TV
.
 The event was held last weekend at the scenic and spacious Jomeokee park and campground which is also home for many area bluegrass festivals... but this weekend it belonged to us. Large spacious fields as far as the eye could  see surrounded by beautiful picturesque mountains, particularly nearby Pilot Mountain, is what made this an ideal location.

Through out the day the Boy Scout patrols, lead by their Senior Patrol Leader, competed with other patrols in  a full spectrum of events that included everything from using a crosscut saw to saw a log in half to working as a team to put up a canvas tent. Since Scouts is mainly a youth led organization I spent most of my time in the field at each station cheering on the Scouts and looking for opportunities to encourage teamwork and good sportsmanship.

One popular event and opportunity to score points working as a team was the crosscut saw competition. Believe me it's not as easy as it looks. To saw off a chunk of wood in the least amount of time possible, both sawyers had to work in almost perfect synchronization with the push/pull or the blade would easily bend and stop sawing. The fellow sitting on the log above the saw in the picture to the right did a fantastic job, all day long, patiently working with the boys and teaching them how to do it right. It's adults like this that are the true heroes!
If you look closely at the picture to the left you'll see a thin piece of twine stretched across the fire bucket. This was the fire building station where the kids competed to test their fire building skills to burn through the twine in the least amount of time possible.

The teams were timed on how long it took to burn the twine then their points were determined. Sometimes frustrations ran high when once a flame quickly went to smoke and cinders. The "Flaming Beavers" patrol in the picture to the left took almost 15 minutes to burn the twine but they never gave up.

As seen in the pictures below, another station was the tripod lashing where a patrol had to connect three pieces of bamboo then use a non-supporting knot to swing one group member off the ground. Kids absolutely loved this event perhaps because their contraptions resembled something out of the jungle. Best of all every member of the team was important to their success, because if they were using the best possible strategy they would use their smallest member to swing from the tripod. This activity generated a lot of group spirit and pride as the crowd cheered them on.

Another challenging event was found at the knot tying station. Each member of the patrol randomly drew a card that had the knot they must tie written on it. As seen in the picture to the right the Scouts could use their Scout handbook for reference but I only saw one patrol that had theirs. Knots included the bowline, two half hitches, taut line hitch, square knot, and a clove hitch. This event required some patience if your knot tying skills were rusty.

For a locally led Council event I was impressed with this Centennial Celebration where everyone had a safe, active, and very hands-on weekend. Other events included first-aid, map & compass, numerous games, fishing contest, and setting up a canvas wall tent. Once again the Boy Scouts of America has come through in meeting these critical hands-on activities that every boy should have the opportunity to explore.


Every troop had way too much fun finding creative ways to transport their cooking and drinking water about 200 yards from the water buffalo to their campsite. The group seen in the picture above must have collapsed 10 times from laughing so hard at their own efforts and at their hilarious water shuttling contraption.

Sunday, May 2, 2010

WIP: Carving A Two Foot Table Totem Pole- (Part 3 of 4)

WIP= "Work in Progress"

With the main body of the totem now complete, less the paint and finish, I now go on to the wings and the stand. As seen to the right I used a 9" X 3" X 1/2" piece of poplar for the wings.

As previously mentioned, this particular batch of poplar has been a pleasure to carve and I'd have to say that only basswood would have been a greater joy to work with. The poplar probably does have more potential to split or chip while carving but I still consider it a quality carve.


After sketching out the wing design that I wanted onto the wood, I then did a rough-out using the bandsaw. I also chose to cut out some v-notches on the lower side of the wings which gives it a more powerful and realistic look.

Next I used my jack knife to score the shields and the large eye with shallow stop cuts so I can got a raised relief look for the wings surface area. Raised relief is always a lot of fun to carve, removing just enough wood from each cut to shave out one layer at a time. Newer carvers tend to remove too much wood with one cut and sometimes chip their project unintentionally. To avoid this mishap I always remove just one thin layer of wood at a time, shave it away, then repeat until the desired depth is obtained. Take your time and enjoy the carving process.

With the wings completed I then used the bandsaw to cut out the notch into the eagle where I wanted to insert the wings. I just scored the notch area with the bandsaw the depth of the wings numerous times then used my jack knife to clean it up for a tight fit. Using a bit of wood glue and three 1/4" dowels I then made the wings a permanent part of the totem.

In my early days of carving small table totems I sometimes mounted the wings before carving the designs into them. That was a big mistake that I finally corrected because they are much easier to carve in my hands off the pole, then mounting them. Live and learn.

As seen in the pictures directly below I then milled out a 4" X 3-1/2" X 3-1/2" piece of western white cedar for the stand. I very carefully marked the center spot where the base of the pole would be inserted.

I then used a small fostner bit on the drill press to drill out most of the waste wood thus producing an obscure hole for the totem that was cleaned up with my chisels. I carved it out just a bit at a time until I achieved the nice tight fit that I wanted. Once again, a little wood glue made it a permanent part of the pole.


As seen in the pictures to the left I also used the belt/disk sander to taper the square stand from the bottom upwards with a smooth flow into the pole.

I will post the final installment of this project in a few days which will include the completed totem in full and finished living color.