Showing posts with label forked branch carving. Show all posts

Monday, August 30, 2010

WIP: Forked Branch Carving: Meet "Da Wiz" (Part 2 of 2)

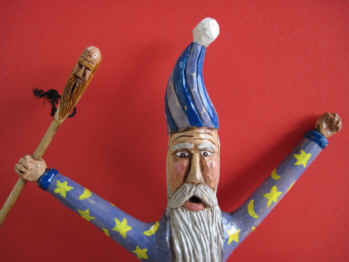
The 'wiz' is now carved, painted, finished, and now standing its ground on the nik-nak shelf. I liked carving this project because I had only limited control over how I would shape the body since that was already pre-determined by the forked-branch limb itself. A block of basswood can be shaped pretty much into any shape preferred but not so for this kind of branch carving. It adds a neat new challenge to carving that I like to tackle on occasion.
As seen in the pictures I decided to use a watered down variety of acrylic paint to the point where it was applied more like stain rather than paint. I did apply the yellow stars in full strength color which was necessary to get the right contrasting against the light purple clothing. Looking back, I suppose that it wouldn't have taken much alteration in design and finishing colors to make this a Santa then perhaps the woodspirit staff could have been his reindeer whip... Just a little brainstorming :-)
As for attaching the wizards staff I first drilled a 1/8" hole straight through his right hand as seen in the picture above. This is something that needs to be planned before carving the hand which will grasp the staff because the necessary room must be allowed for the addition. I then went on to use a 1/8" piece of dowel rod for the staff then I drilled a small hole into another 'slightly larger' piece of dowel rod and glued them together as seen above.
As seen above I then carved a simple woodspirit face into the upper part of the inflated staff which compliments the wizard and makes the carving much more interesting. I glued the staff permanently into the hand and then drilled a super small hole for a small nylon wrist strap dangling from the staff.


This has been a super fun carving project and I'm sure that forked-branch carving will continue to have a place in my yearly carving endeavors.

If you would like to see 28 higher quality pictures of this project from beginning to end then just click here for my Facebook album on the 'Wiz'.

Wednesday, August 18, 2010

WIP: Forked Branch Carving: Meet "Da Wiz" (Part 1 of 2)

WIP= "Work in Progress"
Just a few days ago I posted a short series about my experiences with "forked branch carving" and it was so enjoyable I thought that I'd share my most recent endeavors into this unique kind of carving. The best part is that you don't need an expensive piece of basswood to get started. Instead, this kind of carving provides you with the perfect excuse to get out of the house and into the woods to find a good forked branch suitable for your project.


Of course the first thing that you'll need is a forked-branch. As seen in the picture to the left I found a small red maple tree that had fallen in a recent wind storm. I'd been watching it along the trail for several months until the leaves had browned and the wood had become relatively dry. I cut off the portion of the branch that suited me and sat it inside the woodshop for a couple more weeks just to see if it was going to start cracking. Finally I was confident that it would be a good piece of wood for carving.
As seen above I first prepped the stick using the bandsaw to put a little curve into the top part where I wanted to carve the wizards tall, pointed hat. I then went on to begin shaping the face.

With the face and hat finished I then went on to carve the old mans beard and hands. I found a nice piece of river birch under the table counter that was left over from an earlier lathe project that I used for the base as seen in the picture to the right. I just carved the end of the wizard stick to fit nice and tight into the stand, applied some wood glue, then secured a tight fit.

Ahhhhh, all done... except for the light sanding and paint job which I'll post soon. I'll also show some pictures about how I carved and attached the little tiny woodspirit walking stick into his right hand.

Wednesday, August 11, 2010

WIP: Forked Branch Carving: Meet "Herbert Sherbert" (Part 2 of 2)


WIP= "Work in Progress"

 Herbert is now finished and standing his ground proudly wherever I decide that he will stand. As previously mentioned in part 1 of this carving, it was one of my funnest projects ever. In the past I have dabbled with forked-branch carving but this particular project has taken my curiosity to the next level, which as a carver, has always been an ongoing goal.

Note in the pictures above the "Popeye" forearms of Herbert. That is just one of the wonderful effects that I was able to achieve by using the mortise and tenon joinery. The bulging eyes, nose, and ears also benefited from this method of carving by attaching various parts of the carving with joinery. I thought about adding a ball cap on Herbert's head which would have added additional joinery but decided that I'd rather have all of his bright green hair showing. After all that's why he was named "Herbert Sherbert".

In the pictures directly above I give you an idea about how I carved the hands for Herbert. I used a small limb of rhododendron, carving one hand on each end of the stick. Keeping the hands on one single long stick made the carving much easier with the natural "handle" then I cut them to size when done.
Since the body of Herbert didn't come with forked limbs for the legs I had to attach them separately as seen in the picture to the right. Once again I drilled a mortise into his body then a tenon on the "legs" section. I also decided not to apply wood glue to this joint since it fitted so squeaky tight and most of all I discovered a nice surprise. I found that putting the mortise hole close to my lips and blowing air at an angle across the surface I had a very loud whistle. That was just too cool for hiding in a permanent joint so Herbert's legs can now be removed at will to amuse folks with the bonus whistle. Sweet!

I finished up Herbert with watered down acrylic paints (including an American flag belt buckle) then applied a rub-on polyurethane. Forked branch carving has now become a regular part of my daily carvings and more interesting creations will follow in the days ahead so stay tuned.

Saturday, August 7, 2010

WIP: Forked Branch Carving: Meet "Herbert Sherbert" (Part 1 of 2)

WIP= "Work in Progress"

Here's one of the funnest little projects that I've worked on this year and it's been "ongoing" for a full month now. Thank goodness it's almost finished and the picture to the left shows exactly where I am with it right now.

What is it you ask? Good question because I've completely made it up as I went and this little fellow has evolved into quite the character. For beginners his name is "Herbert Sherbert" because I was looking for something to rhyme with Herbert when one of the kids suggested "Sherbet" and to paint his hair a bright and crazy color. I wanted Herbert to be a bright, happy, and cheerful fellow so that name sounded good to me.

I began this little mortise & tenon carving project by first cutting a nice three-prong rhododendron branch that was well seasoned. As seen in the pictures to the right those two outer branches looked like outstretched arms to me and that's all that my mind needed to get going. The center branch was a bit too narrow to make a good head so I decided to strip the outer bark away then made the stem perfectly round. I was thinking that I could use it as a tenon to hold an enlarged head securely in place.

As the pictures just below show, I then used a 1" diameter maple branch for the head by first drilling a 3/8" mortise which would tightly fit my tenon. With a little wood glue I then placed it onto the body for a snug fit.


 After the head was securely attached I then went on to drill the holes for the eyes, nose, and ears. I'll post the remaining photos and the finished "Herbert Sherbert" just as soon as I can finish him.