Showing posts with label kids. Show all posts

Saturday, July 31, 2010

Hands-On Pictures Of Rural America from 1939-1943

 I just came across an amazing collection of color photography from an era in American history when life was tougher, but in a lot of ways life was much better than today:
Captured: America in Color from 1939-1943 – Plog Photo Blog

The pictures found at the link above are special because they are some of the only color photographs taken of the effects of the Depression on America’s rural and small town populations. I didn't even realize that color photography was around during this period in time but after a little research I was amazed to discover that the first color photograph was taken in 1861. Apparently it never took off on a massive scale since the color process was not as "convenient" as our digital photography today and certainly not as affordable. Thank goodness that someone was able to capture at least a few glimpses into the past that help us understand a time gone by.

Kodachrome color transparencies  first came onto the scene during the mid 1930's from which most of these pictures were taken. Kodachrome offered the most highly developed process for recording our world for about 74 years but unfortunately it has not been produced since 2009 with the advent of the digital age taking hold. Kodachrome 64 was my  choice for recording the events in my own life for over 27 of those years and I still have thousands of these quality color transparencies today. Digital is hard to beat these days in both value and quality so a great warrior known as Kodachrome is now gone. Kodachrome was the "digital" quality of the day and viewing these pictures can easily fool your eye into believing that they are digital... they are that clear.

Of course my favorite pictures from this rare and magnificent collection are those where the kids are making things with their hands. I have posted two lower quality prints here from that collection but you need to see them at the link provided for their full glory and vivid detail. The first picture posted above (on top) is number 29 in the collection and shows a boy building a model airplane as a girl watches in Robstown, Texas, January 1942. The other picture just above is number 42 which shows children aiming sticks as guns, lined up against a brick building. Washington, D.C.(?), between 1941 and 1942.

Pictures from my own family's  past  have been know to capture my attention for many hours at a time as I scan every detail. I especially enjoy studying the pictures of my own great-grandparents as they were during a time that I never knew, but sadly there aren't many of them. Every detail of that person and their surroundings seems to release a new clue to understanding my own past every time that I zoom into their hidden stories. All of these pictures are "black & white" which have their own charm but to see a quality color picture shows us the world more "as it was" and that's what makes the pictures in this rare 1939-1943 collection so special.

The b&w picture to the left (still no color) shows my two best friends, Scott and Van, (me in the center/9 years old) stretching out a snake for the camera. I like this picture because even in the mid-1960's when this picture was taken, most of the kids spent their days outdoors and/or in the woods and we were barefooted 99% of the time (as in the picture) during our 3-month summer vacation between grades. We'd never heard of "Air Jordans" and would have laughed at the prospect of our parents foolishly forking over $200 for a pair of shoes when we had our own feet to use. In the background can be seen laundry hanging out to dry in the sun... folks don't have time for that today because our societal priorities have been rearranged. Seems most parents now believe that it's more important for their kids to have Air Jordans on their feet while they play their video games indoors than it is to have a parent home hanging out the laundry.

All of the pictures in this collection are striking and I was amazed at how lean and tough that these people looked. Obviously they were from an era where more people lived on farms, grew or raised their own food, and had neighbors that they depended upon for their very survival. Notice that so many of the children were barefooted in the pictures and I bet they didn't feel the least bit deprived without a $200 pair of designer shoes. This was a time of mostly no running water, one room school houses, and no free meals at school. This was a proud, tough America where people provided for their own. Yes they were poor but most children from that era today would tell you that they never knew they were poor. It was a time where nearly every kid, both black and white,  came home every day to a mother and a father and that has become the exception in today's world. As one  commenter so perfectly said, "It was a Real America. Not a hypocrisy, as now."

It's great to know (and to see in living detailed color) that kids were busy using their hands to make things so many years ago. Technology is a great thing but I often wonder where you could find a group of kids like in the second picture above out playing with their sticks and play guns today? Some folks say that there is more "hope" to be found in the future but the future means nothing if we forget the past.

Friday, July 16, 2010

An "End Of The Trail Mystery" on a Creek Ramble

Hands-on learning comes in many shapes and forms. Woodshop class and woodcarving are most certainly a powerful catalyst for extending a child's eduction to a higher level but they aren't an exclusive end to a well balanced curriculum. These pictures are from a creek ramble that I joined on a wet, moist morning a couple of days ago with one of our more adventurous groups.

This mountainside forest was prime for discovery after the previous days warm rain. As seen in the picture to the right, the mist was heavy as we walked up the small stream to it's source. Our 900 acre campus is a true mountainside ecosystem that is a very fragile environment as it is the upper limits of the watershed source that feeds life to the land for hundreds of miles from the mountains to the sea.
This is a special place hidden in a deep Blue Ridge mountain hide-away deep in the forest which is full with life... and the kids know it. All of our creeks follow the steep mountainous terrain upwards and end with the discovery of a cold trickling spring where underground cracks and shifting rocks determine the changing course of our streams over time. This is prime environment for the birthplace of deep woods life and these creeks have it all. Everyone loves to ramble in the water where a new discovery awaits with every step. Just look at the salamander cuddling an acorn in the picture to the right.

During this creek ramble we found crawdads, frogs, spiders in their webs ridden with early morning dew drops, red newts, lizards, salamanders, a garter snake,thick cushy mosses, plus the lichens and fungus which clinged to the outcrops of exposed rocks gradually breaking them down into new soil over thousands of years. Such discoveries are a teachers mecca where potential lessons can be found in abundance and where a kid can learn answers that he won't forget.

The greatest discovery this morning was found in the pictures shown below. On a gravel bar beside the creek one of the boys discovered a pile of animal bones which was complete with skull, jaws, ribs, and legs. Although the bodily tissue had decayed, this was a relatively recent "end of the trail" for one particular animal. This was definitely a raccoon and looking at the evidence which also included bits of fur, this woodland bandit had most likely expired approximately 2 to 4 months ago while also considering that spring floods hadn't dispersed the evidence left behind.
From Wood Trails - Dave Brock
Finding the final spot where an animals life has ended is a rare and special event that has always been one of my greatest anticipations whenever I enter the forest. Such finds usually don't last long since Mother Nature has a very quick way of cleaning herself up. Field mice gnaw away bones and antlers quickly just as a creek side track is washed away with the first rain. Most hikes into the woods will reveal the "parts and pieces" to the puzzle of an animals mysterious life trail, such as tracks, feathers, disturbed vegetation, or a freshly dug hole but none of these compare to the thrill of finding a place like in the picture above.

This is the "end of the trail" for one animals life and this final place (sort-of) brings full circle the mystery found in a pile of bones. The complete mystery of that animals life still can't be completely solved but it causes one to pause and to consider that animal and its part in the web of life. The woods are full with lessons about both life and death but you have to get your hands dirty and your feet wet to discover them.

Note: All of the pictures above were taken during the course of the one-hour creek ramble described above.

Friday, July 9, 2010

Outdoor Education: Drama At Its Best

Today I had the opportunity to work with a group of kids in the woods who were experiencing some behavioral issues and they couldn't make it to class. Normally I like to use woodcarving in these situations to get the hands busy and the mind engaged in producing some positive results. That's not always possible when the kids aren't at an acceptable level of "calm, cool, and collect" that is essential for safety during such activity with carving tools.

Sometimes I have to switch gears and look for other ways to make sure that our precious time isn't squandered and another opportunity to learn isn't lost. This is when the digital camera comes in handy and I'm able to save an otherwise lost day. This hot July weather has brought out an amazing movement of wildlife and I've found wonderful opportunities to capture some amazing wildlife shots using the micro lens of my camera. I immediately got the kids busy to see how much wildlife activity that they could identify and I told them to think "small" because on just one of our mountain trees there were probably a thousand scenes of natural drama if only they could find it.

Within minutes a couple of the boys brought me a nice slimy salamander from the nearby creek but most of the sightings were close at hand right where we sat. An army of termites were busy all over the logs where we sat, moving in and out of their holes with their wings buzzing in activity. This was a great opportunity to talk about natures cycle of life and how all this activity going on all about us kept the forest alive and well.

The grand jewel of the morning was when one of the boys yelled for me to come see a spider in his web as it devoured another spider. These kids were ecstatic over their find and so was I as I pounced over a log while flicking the on-button of my camera. This time it's the drama produced in the trap of a spiders web as one vibrant and determined predator spider captures a Daddy Long-Leg spider, spins it into the trap of its web, then injects a paralyzing poison and proceeds to suck out it's nourishing body juices. Just don't get much better than this! Here's the video of that amazing event:


On a nearby rocky hillside we spotted a groundhog but he quickly vanished into his hole... no ordinary "human" hole but a special hole that only an animal can make which aerates the soil in the forest helping it to breathe, drain, and continue the cycle of life. To some this was only a groundhog but the story goes a lot further for those observers who ask questions and wonder about the complete story which is usually beyond what the eye can see.

On a few occasions the kids aren't able to make it to their regular classes but that's when new opportunities must be found to learn because time is precious and our kids are just too important to  observe from the side lines. If you're a teacher, a parent, or a youth leader always be looking for ways to engage the kids in your charge because the most powerful classrooms in the world are those found in the Great Outdoors. Get your kids hands dirty, their feet wet, and with a little direction their own curiosity will lead to some of the best lessons in their lives.

Note: All of the pictures used in this article were taken on location during the last couple of days in our outdoor classroom with the kids. These were only a very few of the creatures that we found.

Wednesday, April 7, 2010

The Lessons Of Pinewood Derby

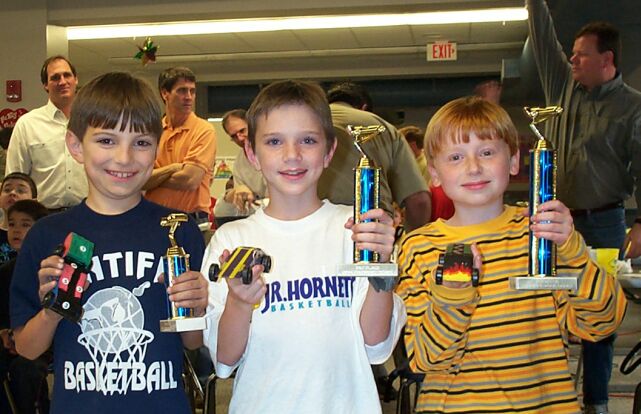
Pinewood Derby has been alive and well for over 50 years as a premium Boy Scouting event. Although the races are predominately for preteen Scouts, it is my experience that this event can generate just as much enthusiasm, competition, and fun for every age group including adults. Our troop just had our annual "April Fools Day 500" race and most of our kids are 11-16 years old and of course, we always have an adults racing category.


So just what are the lessons that can be learned by participating in a pinewood derby race? That is almost an overwhelming question since there are so many answers on so many different levels. The greatest benefit from participating in a pinewood derby race is the opportunity for quality time between parent and son. It's a time when the video games and the TV can be turned off and stronger  relationships can be built with this simple hands-on project.

As a woodshop teacher it is one of my greatest joys to share my experience building cars with the kids. Some will listen and absorb everything that I have to say while others will take off on their own. Some will polish their axles and  align their wheels for the fastest possible speed while others will concentrate on just a sharp looking car. Either way it's very satisfying watching their ideas on paper transform before our eyes into a potential winner.

Secondly, building a pinewood derby car is a hands-on activity where a kid can learn to use a lot of tools such as saws, drills, chisels, carving tools, etc. There is also the potential for lessons in craftsmanship, physics, strategy, and execution.

Lastly pinewood derby is a great lesson in social dynamics. Kids learn a lot about sportsmanship and giving their very best effort when building a car then racing it against many others.

Pinewood derby is one of the most anticipated Scouting events each year where thousands of adults and kids have way too much fun. More than the fun I'm always looking for new lessons to teach that will help kids become the successful adults that they are capable of becoming. The 2010 race is now history but I've already begun planning my car for next years race. No matter how many decades that I've been racing I always find new things to learn about these simple pine cars that have the potential for so many life lessons.

Monday, April 5, 2010

Pinewood Derby Totem Pole Car Finished

So many projects and so little time, but I did finally finish the totem pole pinewood derby car that I started in this post a while back. The race is over but I decided that I've won enough trophies over the years so I didn't build this car for speed; rather I went for making a unique car design and I believe that I hit the mark on that account.

The design has an eagle on top, a coyote, a frog, an Indian chief, then a bear. This particular car makes a great addition to my other table-totem pole display when sat upright and I'm sure that it will be quite a conversational piece for years to come.

Tuesday, March 23, 2010

Pinewood Derby 2010: The Power Of Simple Tools

Currently everyone is focused on the upcoming April Fool's 500 Pinewood Derby race next month so both woodshop and Scouting classes have been spent working on the winning cars. During Scouting classes we are usually on the trail working with map & compass, fire building, or perhaps a natural science hike but lately we've been working on our cars.

Working on our cars outside the woodshop during Scouting classes presents a wonderful opportunity for the kids to be more resourceful since the saws, drills, and hammers aren't available. What we do have are the most essential tools available which are our hands and our minds.

After more than 15 years in the woodshop, I am still amazed at the power found in a simple piece of sandpaper. Here we have all of these wonderful power tools (and yes they are wonderful!) but in their shadow I so often see equally powerful transformations of the mind and hands occur with just a simple piece of sandpaper.

As you can see from the pictures to the left, I spent almost two hours last Friday with one group working on their derby cars with no more than one piece of sandpaper per person and a few carving tools. The kids really got into the sanding with an intensity that would never be accomplished inside the woodshop. This was all that they had so they adapted to the situation and used their sandpaper like the sculpting tool that it was. They would fold in, re-enforce it, and shape it to reach the odd contours of their wood.
On the car to the right, a very nice hood scoop was first chiseled away with a small carving knife then another 45 minutes was spent carefully shaping it with a simple piece of sandpaper. Also notice the fine hood lines directly in front of the scoop that was the result of correctly folded sandpaper, even hand motions, and a fine connection of hands and mind to wood.

These same connections are also obtained from using power tools but sometimes I believe that an even more powerful connection occurs with just our hands and simple tools. Using just the hands is a more "primitive" connection with the wood and I think that something in our head registers the activity in our brain as being real, basic, and fundamental to our very being.

As seen in the pictures to the right I worked with another group today in our cabin as they had only sandpaper, carving tools, and paint brushes as their main tools. And once again another hour passed by way too fast. Here 12 kids sat around the table using their hands to fashion the  cars in their own way and if I had to sum up the class in one word it would have been "contentment".

They sanded their wood, they painted their tire rims, and they carved shapes to their cars. I moved around the class providing hints but most of all I complimented the creative ideas that had been produced from such very simple tools. Even though we weren't inside the woodshop with all it's expensive power tools, I also didn't hear a single whimper. They only had their minds and a few simple tools to make a meaningful and productive connection with their wood and they did it well.

For hours on end, they are content when using their hands to make something. They are calm, patient, and seem to have a lot more mutual respect for one another during these periods. They are also learning to be resourceful with just a few basic tools. Like the sandpaper they use to shape their cars, I am also convinced that the character of these kids lives are also gradually "shaped" into a better, more successful person. Never underestimate the power of using simple tools.

Monday, March 8, 2010

Pinewood Derby 2010: I've Decided On A Totem Pole Car!

For the adults category of this year's "April Fool's 500" pinewood derby race, I have begun carving my car. Seems like I've made every car possible during the last 30 years of ardent racing competition so I decided to pursue a totem pole car for 2010. As the accompanying pictures show I have designed it to sit upright, just as a real totem stands on sacred land so it will double as a fine nik-nak shelf piece after the race.

Each car starts out as just a 7" block of pine with four plastic wheels and axles, then as the pictures to the left show a design must then be thought out and applied to the wood. My totem starts out on the bottom with a bear, an Indian with full head dress, a frog, a coyote, and an eagle towering above on the top.As the pictures above indicate, I used some of the scrap wood cut away from the center of the pinewood block for shaping the eagle wings separately.

This car is going to be extremely light so it's not going to be a fast car... and that's okay because for a second year I've decided not to go for speed
because I just want to have a nice car and I think that a totem pole will be that car. Although I've begun painting the totem-car I still have a lot of detailing to go, so perhaps I'll post pictures of the finished car later.

The trophy shown in the pictures to the right is the car that I entered from last years race and yes, that's Dolly Pardon driving her pink country girl car. As mentioned above I also decided to step aside from last years race since I already have enough winning trophies on my display shelf and that would give others a chance to win.

So how did I get that wonderful trophy you ask? Although I didn't race it in the speed race I did enter the car in the competition for "Best of Show" and I'll be darn if she didn't win! Dolly is one of the funnest cars I've ever made and she surely produced a lot of laughs from everyone. Some even accused her of being too "front" heavy (use your imagination) so I guess it's a good thing that I didn't race this car. A pinewood derby race has the potential for a lot of fun, laughs, and group spirit so once again, if you haven't been part of such a race then find one in your community and help a kid have the time of his life!

Friday, March 5, 2010

Pinewood Derby 2010: Start Your Engines!

The pinewood derby comes around these parts about spring time each year and April 1st is currently the official race day for the April Fool's 500. During Scout classes we will be examining a lot of things which will include the history of this classic Scouting event since 1953, a look at different car designs, our rules for the race, then ultimately each participant will design their winning car on a project design sheet.

Although the initial beginning of the

event begins in the classroom it is the moment of actual hands-on activity that everyone anticipates. To a pre-occupied adult the preparation for a race might seem insignificant but in the minds of kids this is a very big event for them. I know because I'm working directly with them and I know for a fact that their brains are on "wide-open". Walking around campus or the dining hall someone is always sharing their new idea for a car design with me so getting them in the woodshop is as exciting for me as it is for them.


Once the foundation has been laid and they understand the basics of what the race is about, many of the kids can come up with some very creative designs. Every year I'm always surprised at what their minds conjure up once they have just a basic understanding of the cars. As seen in the picture above, just last week one of my students had cut out his car then decided to use the scroll saw for some fancy cutting out of a nice tail-end spoiler. I've seen a lot of spoilers glued on to the tail-end of a car but this kid knew how to make the scroll saw work for him and he now has some very attractive detail that stands out from the crowd. That's special.


Some of the students will spend a lot of time sketching out their design as a combination of their own ideas and the designs gleaned from several books on cars that I have available for research. As a beginner woodworker we have all attempted to copy an exact design from a book or magazine to make it ours and that's just fine as part of the learning process. But at some point during the life of a woodworker something begins to "click" inside our heads when we step out of our comfort zones and take a risk. Before you know it we are designing and building things that we never could have imagined just a few years earlier. That's just the magic of woodworking and I love to see it happening right before my eyes... and it does every day in woodshop class.


As seen in some of the following pictures the pinewood derby has mainly been a Cub Scout activity for boys between 6 and 10 years old for more than 50 years and the popularity of the sport is huge in the United States. Strangely it can be just as compelling for the adult leaders as it is for the kids and our troop is no exception so we also have an adults race category so the big kids can have a little fun too.

And even though pinewood derby racing is primarily for the little kids I can honestly say that it has a very broad appeal to all age groups. It's fun, exciting, and contagious! The age group of our troop runs between 11 and 16 years old and it amazes me that more Boy Scout troops don't have annual races... well, except for us of course. Pinewood Derby racing is mostly a Cub Scout activity but don't tell that to our troop!

If you aren't already part of a big race day each year then consider getting involved and working with a kid on a car that might not have one otherwise. Pinewood Derby is one of the most effective parent/son activities around so turn off the video games and the TV and spend some quality time together. You won't regret it.

Monday, February 8, 2010

A Random Minute During A Woodshop Class


This is a quick one minute clip from one of my woodshop classes last week. We build, carve, and burn a variety of projects but, like today,I find that students achieve the greatest success if they concentrate mainly on practicing simple woodshop techniques then gradually progress to a higher level.

This video gives you a very quick glimpse into a typical day of woodshop classes where approximately 60 kids each week have the hands-on opportunity to learn new skills. Unfortunately woodshop programs in our elementary and middle schools are disappearing at a rapid rate which is sad since such a program so perfectly compliments their conventional "in the desk" classes. And education experts wonder why boys are doing so poorly in school during the last decade.

Boys weren't made to sit still all day and listen to lectures. Boys learn best when they have a well balanced curriculum where "hands-on" and action/adventure based learning is part of their day. When educators figure this out then our next generation of boys will have a much greater chance of achieving great things.

Sunday, January 24, 2010

2 X 4 Jeep Update


After a few more days, finding a minute here and a minute there, I have finally finished the paint job on the 2 X 4 jeep that I posted here. This is the kind of a project that is just fine without a paint job and if you were to sell them painted then you'd surely go broke. A detailed paint job like this takes a lot of time so you do it because you have a love for detail, or in my case as a woodshop teacher there might be one other reason.

When constructing any project I always like to have at least one example of the possibilities for what "can be done" for the students in my woodshop class. Most of them won't take the project this far and that's ok but I still just want them to see what can be done. That's important because once in a while I will most surely be surprised when that one kid will take the challenge and that will be worth it all!

I decided to go with the camouflage look for the overriding theme but I suppose that it isn't exactly an official U.S. Army issue jeep since I also gave it a touch of "wild" with bright interior colors with a funky spare tire case to boot! Those kinds of twists in finishing a project make it a little more interesting and I like it when someone looks at it and says, "Are you perhaps a little bit crazy?" as they smile in approval.


As mentioned in the previous post I suggested that this project might be most successful in the hands of older kids and that a simpler 4-wheeled car/truck might be best for the younger kids. As seen in the picture above I've included a couple of easier project ideas for the younger woodworkers. Both the truck and the car can be easily made in usually one or two woodshop classes from a piece of 2 X 4 scrap. As a matter of fact quite a few of my older students like to make these easy cars too because after all they are a lot of fun to push around and best of all, they made it with their own hands.

Tuesday, January 19, 2010

A 2 X 4 Jeep Is A Great Woodshop Project


One of the best parts of my job as a woodshop teacher is new project development and I make every effort possible to correlate our educational theme with a good project that compliments our students focus of study.

A woodshop class can be a very powerful hands-on extension for any educational curriculum and those schools or homeschooler's that implement such a "full-circle" plan of study will reap the greatest rewards and benefits from their efforts to teach.


About two years ago I developed a new project jeep when our students were studying World War II and I designed the entire wooden toy from a 7" piece of 2 X 4. I reasoned that a jeep would be the perfect woodshop project since this multi-terrain vehicle was specifically developed for the U.S. Army and their allies during WWII.

When developing a new project I always do my homework first so I did quite a bit of research on the jeep and I gathered the history of the vehicle, it's vital role in transportation during the war, and as many pictures as I could find. From this I could better brainstorm ideas for a good bulletin board on the project and organize some worksheets on the jeep for the students. By this time in my research I had begun to formulate the foundations about how I would develop the actual thematic project.

During this session I have once again brought out the good old reliable Army jeep as a woodshop project but our education theme for study now is "Around The World In 80 Days". Seems like there is a transportation element to this theme so the jeep should work out just fine. With just a minimum of adjustment this same project could also be easily modified to be a dune buggy.

The best part is that it can be made from just a 7" piece of 2 X 4 where I first cut off about a 1/4" slice of wood as shown in the picture to the right. The next important cut is made with the band saw, as seen in the picture to the right, where I separate a block from the chassis. The block (my fingers are on it in the picture to the right) can be used to cut out the jeeps seats, bumpers, windshield, panels for bed, etc.

Other parts needed that didn't come from the 2 X 4 would be the Plexiglas windshield that I hot glued into the wood frame. The wheels and axles were donated to our woodshop program in a very large quantity but you could also modify a dowel rod or old broom handle into some pretty nice wheels too so be creative and find the solutions that will work best for you. The headlights, taillights, and steering wheel assembly were also made from various sized dowel rods. I used the woodburning pen to etch in the radiator grill on the front side of the jeep.


To make this project easier for kids to process I made a tracing template for the chassis and I also made one for the side fenders/step assembly as seen in the picture to the left. From many years in the woodshop I've discovered that kids have a MUCH greater chance for success when they can first visualize the completed project so these templates do their job well here. Also it's very important to have at least one completed example of the project on hand so that they can see it, feel it with their hands, and feel comfortable to ask questions.

I would rate this project as "advanced" in my woodshop program working with at-risk kids who sometimes don't have a lot of patience. The 15 and 16 year old kids seem to do best with constructing this jeep and I would recommend designing a simpler car or jeep for the younger students. This is a fantastic project for kids but they need to understand that it will require great attention to detail and the ability to focus on a lot of individual components. If they can keep their eye on the prize then they'll have something to be very proud about.


Tuesday, December 22, 2009

Jingle Bell Penguins And One More Christmas Critter


Just when I thought that I was done with carving "Simple Simon" the penguin as presents for this years Christmas season I came up with a new addition that I thought made a big improvement on an already nice project. As you can see in the picture to the left I simply added three small bells to the rear side of the penguins neck by using some thin red holiday ribbon. All of these supplies are readily available in the craft department of your favorite store. After securing the ribbons I then tied a final knot in the front leaving about an inch of ribbon on each side. I then rubbed the ribbon between my finger and the dull side of my knife blade for nice "swirls".

One more Christmas critter that was added to my collection yesterday was "Bessy The Red-Nosed Milking Cow". As mentioned in several previous postings this project started out as making miniature reindeer but the kids in my classes always come up with several new ideas each year thus adding to my showcase display for future classes. "Bessy" was the final creative brain explosion for this years class and it's already a favorite with everyone who gazes upon her hilarious construction.

Bessy was made just as all the other critters but if you look closely at her rear-right leg you'll see that it's slightly raised for "milking". There was also a slight knot on the underside of her belly where 6 tiny dowels were drilled into place in a circle to imitate her milking utters which were painted a light pink color. The rest of the deer was painted as a jersey milking cow with big black & white spots and a red fuzz nose added for Christmas. This one was just too much fun to make and perhaps she will inspire some new ideas for you too!

Sunday, December 20, 2009

Woodshop Christmas Project #2- Reindeer & Christmas Critter's (part 3)


As you can see the annual Christmas critter's project has continued into it's last week and the last classes for this project was on Friday. Outside the woodshop the snow blizzard moving up the east coast from the Gulf of Mexico had already dumped 4 or 5 inches of snow on the ground outside the woodshop but since I have a 4-wheel drive Tacoma I stayed until the very last minute of the very last class because those kids would have been sorely disappointed if I'd left them with unfinished deer.

When you can look outside the woodshop windows and see snow falling in blizzard proportions it creates an ultimate Christmas time atmosphere. When the atmosphere is so conducive to the human spirit such as when the snow is falling, I'd swear that creativity in working with the hands is increased ten-fold. Maybe I'm wrong but perhaps I'm right because Friday's class sure did seem above average in spirit and creativity.

Although it's not exactly a "Christmas" deer the picture at the top/left shows the creation of Robert's bull. Robert was steadfast on the idea of putting together a bull so I allowed him complete creative freedom and we both ended up being thrilled with the end result of three classes. After he painted his bull black, added the eyes, and a red cape Robert thought that he was done but that is when I challenged him to extend it even further. With some thought I sketched him out some bull horns on a small piece of pine then after cutting and some carving Robert had the defining symbol of a bull. That addition inspired him to add some yellow pipe cleaners for even more accent, then it was completed with a tail made from a brown pipe cleaner with some twisted inner bark of a poplar tree hot glued on for the tail. I thought that his bull turned out just great and I know that he can't wait to show it off to his family in a few days. He even named him "Paco"!


Hands were busy today and it's also great to see the adults get involved with the kids crafting too as Chief Rachael is so adamantly focused on in the picture to the right. When the kids are having trouble focusing on the task at hand our counselors are usually quick to notice the need and their attention is focused on working directly with the kids to help ensure success. However when the group is running well it is a joy to have the counselors working on their projects too and that also can go a long way in building group cohesion.
Sometimes the kids just get completely crazy ("crazy" in a good way) when their creative juices get the best of them. The Mother Goose bird to the left is one such example of how hilarious this project can be for a group of youngsters. A small piece of red maple was used for this critter and the two lower legs were first roughed out on the bandsaw, then shaped up more with a pocket knife. At this point the legs could be mounted and glued into 1/4" holes drilled into the wooden stand.  Jack had a great time doing this bird but it wasn't too complicated since he desperately wanted some extra time for finishing up a nice kitchen cutting board that he's been working on for a month prior to the Christmas classes. I agreed to grant him this extra time but first I expected him to come up with a nice Christmas critter so we made a deal. Jack is one of my most ardent woodcarving students and most of his projects must have some kind of carving involved and this bird was no exception as he continued to fashion the head and beak. Jack completed his Christmas bird with a set of over sized googly eyes that looked more like sunglasses than eyes thus adding to the humor factor, then a spread of white tail feathers completed the project. Nice work Jack!

 As you can see from the picture to the right I have made several Christmas critters that I always display on the work table each year to give my students an idea of what they can do with just 7 or 8 simple sticks from a tree limb. Actually the Christmas moose that you see came from the mind of Seth, a student from last years class. Seth was determined to make "Rudolph the Red-Nosed Moose" so I helped him come up with a way to cut out the awkward shaped antlers with some fancy bandsaw maneuvering into a piece of 2 X 4. At the time I made a template for cutting out the moose antlers so that the kids can now easily understand how to go about fashioning their own. Another version of the Christmas bird in the picture to the far right is similar to Jack's bird however a nest was made for this one with two white fuzz balls added to imitate eggs. As you can see we have taken deer making to a whole new level that has certainly proven to intrigue the minds of both students and adults.


Wednesday, December 16, 2009

Woodshop Christmas Project #2- Reindeer & Christmas Critter's (part 2)


The Christmas critters classes have continued and as usual the kids have come up with even more original and creative ideas. It amazes me every year with how many new ideas can be visualized and created by my students and 2009 has seen the addition of several new Christmas "critters".

The deer that I'm showcasing in the picture to the right was made by Arturo and he finished it just this morning. In every class there's always one or two students who are so caught up in such laser beam concentration upon their project that it's fun for me to just look over their shoulders as the gears in their minds direct their hands into some great creations. Arturo was that student who didn't utter a word in todays class as he was so caught up in his deer. As you can see the white feathers that he hot glued in place really set off the antlers making it the dominant focal point when you look at his deer. Nice work Arturo!


Hands were busy again all week long on getting the miniature deer finished before Christmas break and so far it looks like we will stay right on schedule. The holiday woodshop classes alternated between working on the birdhouses and the Christmas critters so things are busy around our parts right now. It also amazes me to see how such a simple project can stimulate the minds of all age groups. Several of the counselors were also able to attend some of the woodshop classes this holiday session and it was hard to separate their enjoyment with making this project from that of the kids.
Another new creation that came out of this years holiday classes was "Rudolph the red-nosed horse" as the picture to the right explains. This critter came out of the mind of Anthony who had a hard time during his first several months in our program and his anger even prevented him from participating in his first woodshop class. As the days and months have passed by Anthony has become one of my best and most confident students and that is something that I'd never have predicted four or five months ago. It was a joy to work with Anthony on his idea to make a Christmas horse. As he progressed from one idea to another on turning his plan into a reality Anthony would usually ask my advice on how to solve a certain problem. We had such a great time, mostly laughing as such a hilariously new critter was created right before our eyes. It was such a great experience that I decided to make a small colt as you can see as the smaller critter in the picture to the right. Once again it's amazing how such a simple project can have such enormous power to foster positive relationships, muster up new-found confidence, and the capacity to help change lives for the better. Great job Anthony!

Quienten was another student who chose to exceed expectations in my woodshop class with his chillin' Christmas chicken as seen in the picture to the left. This was a top secret creation and I watched his progress through two classes before I completely understood what he was doing. I knew that he wanted to make some kind of bird but I wasn't so sure about Quienten's methods. Regardless, I kept the faith that he was on the right track and continued to allow him the creative freedom to continue as he always appeared so confident with his hands although I knew that his brain was occasionally straining to it's limits. In the end I must admit that I was both amazed and pleased at what he'd come up with and Quienten was so proud.


Saturday, December 12, 2009

Profile: Alex Is Making Pens For College


It's not very often that you come across a kid that's really into working wood and I mean REALLY into the hobby... so much into it that at only 12 years old he's started his own business selling extraordinary homemade pens to raise money for his own college fund. First, I'm most impressed that in the popular culture of today's America when it seems like more and more people are looking for a handout, here we have Alex who has taken steps to secure his own future and on his own terms. Now that's impressive!

Just click on the video above where Alex tells his story in his own words and the video below shows him in his dads workshop as he actually makes one of his unique pens step by step. After watching the video below it is obvious that this boy has achieved a masterful level of competence in using some heavy-duty woodworking machinery. His hands are steady and he knows exactly what he's doing. Alex has a plan to one day attend Duke University and study to be a heart surgeon and I can only hope that he will be available as "Dr. Alex" if  the time ever comes for my own heart surgery one day. You can also learn more about what he's doing by visiting his website, Pens For College. It's kids like this that renew and inspire my faith in the next generation. Nice work Alex!

Friday, December 11, 2009

Woodshop Christmas Project #2- Reindeer & Christmas Critter's (part 1)


During the Christmas holiday season I decided to make all of our scouting classes an additional "bonus" woodshop session where the kids made miniature reindeer as presents for their family and friends. Since the early 1990's  we have always made the larger "log" type reindeer as a camp-wide Christmas project using the flaky barked river birch as the bodies and dowel rods for legs, but last year I came up with the miniature reindeer which has proven to be an even better (or at least more practical) project in my opinion.

The larger reindeer which had an average log body of about 4" diameter and a foot long was definitely a wonderful project however it required a small army of people to cut the logs, then we would make an average of 75 reindeer every Christmas. As you can imagine the logistics for making this particular project a success required a lot of staff time in gathering, preparation, then loading them onto a trailer for transportation to the Christmas bus stop. A seemingly simple Christmas craft had become quite an extensive operation and this is where the development of the miniature reindeer came to our rescue.


After some experimentation I developed the perfect solution by just scaling down our reindeer production to a more realistic size for a student body of approximately 60 kids and more than a dozen counselor staff. If there were ever a case for the saying that sometimes, "less is more" or that, "dynamite comes in small packages" then it would most certainly apply to this great little project. In my opinion I would now much rather have the smaller deer and it seems that you can get much more creative in making them too with the more compact sizing of the deer and the materials used to decorate them.

As the picture to the right shows I have a box with the small deer bodies, necks, and heads pre-cut before the class arrives and I also have a nice selection of smaller limbs that they can cut for legs. Since class time is limited I like to have these items prepped for the kids before class begins which also goes a long way to ensuring success. I begin the class with everyone around the center woodshop table with a short talk about expectations and a brief lesson on the mortise & tenon joinery method. I show them a poster of about ten different joinery methods used in woodwork then let them guess which one that we will be using on joining the deer together. It's a great introduction and sets the stage for better understanding the project at hand.

It's also very important to have an undecorated deer on the table that they can take apart for examination on learning how to assemble their deer. If you're going to lead this project with a group of kids then I can't express enough the importance of having a model deer available for them to touch, feel, and examine with their own hands. It will make a difference in a child's ability to build confidence for this project. Also have 3 or 4 completed deer sitting on the table which have been finished in different ways as this will spawn a lot of good original ideals in the child's mind before he starts.

During the lecture I also show the kids an example of a mortise and tenon joint made by a local furniture company used in producing chairs then explain that we're using a version of this same joining method but with our Christmas reindeer we'll be utilizing a more "rustic" version of this joint. This is a great introduction to one of the strongest joints used in woodworking and probably only the dove-tail joint is stronger.


After this I have the class gather around the drill press where I demonstrate how to line up their mortise holes in a no-fail method for their legs. The deer body is placed firmly in a "V" shaped slot that I cut out of a 2 X 4 so that the wood won't roll on the table while drilling thus making this procedure much safer. After drilling the first hole I then show them how to put my "dummy" leg stick in that hole so that they can then line up the other legs and easily determine exactly how much they wish to make the spread of the legs. Not only is this a good exercise and lesson in teaching sequential thinking as a way to solving a woodworking problem it is also a lesson that will benefit the child in learning ways to find positive resolutions to real life problems. When presented correctly, woodworking can be an enormously powerful tool for not only producing wonderful wooden projects but it will also lay a solid foundation for producing kids that have more confidence, a stronger character, and increased self esteem. Learning to work wood should be required curriculum in every elementary and middle school but sadly for the kids this isn't the standard by which a child's education is measured in today's world.


After a short demonstration on making good mortise holes with the drill press the class gathers at the belt/disc sander where I show them how to make their rustic joinery tenons. Most of this demonstration is centered around safety since skinning up a knuckle or fingernail isn't much fun. The points to remember and practice are to always rest the wood on the cast iron table while sanding, then turning the stick slowly while gradually sanding down a nice tenon. I also emphasize that the wood needs to always be held firmly with both hands and always be thinking about where your hand would go if it were to slip. We have amazingly few accidents in our woodshop program considering that approximately 60 kids pass through my woodshop classes each week. Creating an atmosphere of safety is absolutely essential and the most important aspect of any successful woodshop program.

So there you have it... the story about how the birth of our new miniature reindeer came about. This is a wonderful project for kids and I hope that you will share it with the children in your life. In the next posting I will begin to share all of the creative ideas that my students came up with and you will also learn a lot of new ideas that go a lot further than just reindeer. Kids can be amazingly creative... so much so that I now refer to this class as not making reindeer but the making of "Christmas Critters".