Showing posts with label woodspirit. Show all posts

Tuesday, July 20, 2010

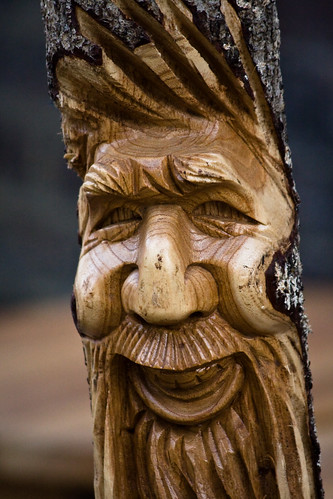
Woodspirit in Black Locust


During the last couple of days I've had the opportunity to teach a quick woodcarving class on woodspirits. The complete carving took us just a bit over an hour yesterday afternoon then today we put the final stain and finish on it.

I had about 5 students help me with this project and they were fired up and proud to be helping. As you can see in the picture to the right they chose a barkless slit about 2' long and 5" wide in a black locust tree. At first I cringed in serious doubt because locust is one of the hardest woods around our parts and only hickory is probably harder. My head immediately had visions of broken carving knife blades that could cost me as much as $75 each to replace. It's happened to me before so I approached this tree with caution.


As everyone watched in anticipation I made the first few cuts outlining the nose and eye-wells with my v-parting tool. I was very careful and made my cuts very shallow until I could get a feel for this particular tree. As you see by the red circles in the pictures to the left a multitude of creepy crawlers, ants, and bugs were in full military patrol with all the hammering going on upon their tree.


The carving went better than expected and with small calculated cuts I decided that the locust was doable. As several of the surrounding pictures indicate, I allowed  the kids an opportunity to do some of the carving with specific instructions as they enjoyed making the cuts. Carving the beard is not too difficult and a good place for kids to get a feel for the carving. Basically they just tapped the large v-parting tool with the wooden mallet trying to keep a smooth flow of the cuts with no crisscrossing.They did an amazingly good job!


With the carving finished we all initiated the new woodspirit as an official member of the group with a pinky kiss.  One by one, we each kissed the tip of our little finger then quickly gave the spirit a fast tapping. It was now there to serve, please, and protect us from all that roamed the wooded forest around us.

The boy seen in the picture to the right was one of my most loyal students and he volunteered to haul the gallon can of finishing stain about a half mile to the carving so I allowed him the high honor of applying the final finish. After this "honey-brown" stain was on he couldn't hardly keep his eyes off the new woodspirit and like the others, he would repeatedly walk past it in admiration. These students did a great job and couldn't be prouder of the new woodspirit friend that has found a new home guarding the entrance to their campsite.

Monday, June 7, 2010

Finishing Up The April Tree Spirit

Way back in April I posted an article on the new tree spirit that I carved during an outside woodshop class which can be found here. At the time of the initial carving on April 9th the pictures didn't show the completed woodspirit with the honey brown stain so finally the picture to the left shows the completed carving.

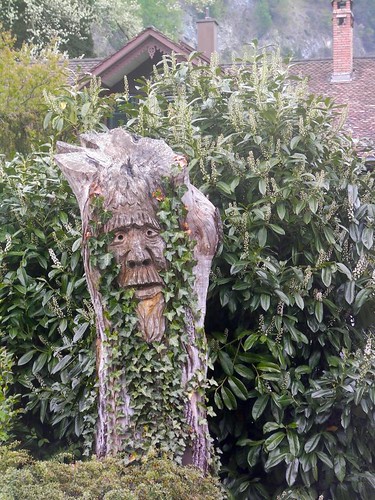
As mentioned in the first posting I carved the spirit into a dead section of a large tulip poplar tree where a tractors bucket hit it several years ago. Unfortunate for the tree but on the other side of the coin, what a great opportunity for the woodcarver!

The woodspirit now stands guard at the entrance to one of our groups campsites to watch over and protect them during their stay in the forest. For two months now this particular group has had great respect for the carving and amazingly they have let it be with no scratches, cuts, or bruising. I hope that it will live on for many more years where hundreds of more kids can have their days graced by the watchful eye of the tree spirit.

Wednesday, April 28, 2010

Woodspirit in Poplar Walking Sticks

Nothing too special here... or at least to me; just two new woodspirit walking sticks. Just recently two such sticks were requested so I've been working on them, here and there, for the last couple of weeks when I can find the time.

Although this woodspirit is my "generic" brand when carving walking sticks, the reason that I decided to post it here is that it's the first time I've used tulip poplar for an order. I've been using these particular sticks when teaching the kids in my woodshop and Scout classes to carve, but until now I've shied away from them in favor of the harder maple, dogwood, sourwood, or sweet birch. These poplar sticks are super plentiful on our side of the mountain and the dried limbs fall out of the tall trees during the frequent winds storms that come our way.
These two sticks were super solid and didn't bear any of the seasoning cracks that poplar so often produces so I decided to use them. Although most poplar sticks don't meet my standards when an order is given, these two sticks did. I especially love the way that poplar takes on the paint and finish with such a bold look that almost jumps at you. The final antique wash sets in excellent with poplar producing the greatest dark/light contrasting that you could hope for. I love using poplar for my walking sticks but it's more the exception than the rule.

As you can see I also painted on five animal tracks below the woodspirit which gives the stick a great compliment to the carving. I hope that the new owner enjoys them as much as I have in carving them.

Friday, April 9, 2010

Woodshop Class Goes Outside: Carving A Tree Spirit

Who says that woodshop class has to be held in the woodshop every day of the year? With one of the coldest and snowiest winters ever we've been cooped-up long enough so today's class was held in a fine wooded spot on our 900 acre campus.

Weather in the mountains is starting to get warm again with today bringing full sunshine and comfortable temperatures in the low 60's (F) so it was the perfect environment for learning something new. As you can see from the picture to the right I had everyone in the class facing me as I carved a huge new tree woodspirit. (See the red circle)

Although you can't see the initial sketching in the pictures to the right, I first used a red marker to make a rough outline of the eyes and nose in a live tulip poplar tree where about 1/3 of the diameter had exposed inner wood prime for carving. Apparently the tree had been scraped by a tractors bucket a few years ago leaving behind the perfect carving surface as I've had my eye on this particular tree for quite a while.

This was a relatively quick carving project since time was limited but I wanted this class of boys to have a unique experience and to witness something that I'm sure they've never been exposed to before. Normally I would rather have first done a rough outline of the spirit with a chainsaw giving it better depth, but that wasn't possible today so this ended up being more of a "surface" carving than I would normally have done. It still ended up being quite nice leaving the class with an experience to talk about for some time to come.


Unfortunately I didn't have time to put the final "honey-brown" stain and preservative to put on it so we'll get that done sometime next week. I'll have to post another picture upon the final completion. The dark stain tends to make a tree carving very bold and helps to quickly catch the eye of a passerby so I can hardly wait to get that done.
As you can see from the pictures to the left most everyone also had an opportunity to do a woodcarving project of their own before the class was over. While I worked on the big tree spirit I also had to keep a close eye on ensuring the kids safety as they had a grand time making mini-canoes, spoons, and carving their names in odd pieces of wood. What a great woodshop class and what a great day!

Sunday, November 29, 2009

WIP: A Thanksgiving Woodspirit Marathon (Part 2-conclusion)


Thanksgiving has afforded me with the addition of four new members to my woodspirit family. They are now finished and ready for duty in the hands of new owners as they will surely explore many new trails. Two of the sticks have some really nice swirls at the top near the handle on the woodspirit beards which make them quite unique and that also makes them feel good in the palm of the gripping hand.


The animal tracks also turned out nice and bold which compliments the woodspirits just right. Over the years I have developed several sets of animal tracks for placing on my walking sticks since most folks request them. I developed their designs from several sources including a large track collection that I have casted over many years in the field. I've also studied numerous tracking books where I've gleaned many other variations of how a particular animal leaves his print in the sand, mud, dirt, and sometimes the track is left wet as the animal steps from the edge of a stream to a rock surface. Animal tracking has been one of my fondest hobbies since I was a child so I am always learning more about what the trails of a wild animal can teach me.

Friday, November 27, 2009

WIP: A Thanksgiving Woodspirit Marathon (Part 1)


 WIP= "Work in progress"

Thanksgiving was a little different this year as I have been engaged in a planned carving marathon to produce 4 premium sourwood woodspirit walking sticks. I chose the wood from my best drying stock and these four sticks were cut last March giving them an approximate drying time of about 8 months.

The pictures on the left show the sticks just after the initial roughing-out phase which is my method for starting all of my walking sticks. During this phase I first cut the stick to 58" long then lightly sand the bark then seal everything with as thin a layer of polyurethane that  I can possibly rub on.

Next the stick goes in the vise where I use my larger carving tools and mallet to rough-out the basic face features and hair. As the photos to the left indicate this leaves nothing much more than eye wells, a square nose & forehead but you get the point.


From this point forward I can then manage the remainder of the carving with the stick in my hands while using my smaller palm carving tools to develop and to refine the details. Some folks seem to be quite successful carving the entire stick while held in the vise but after the roughing out I like to carve them in my hands where I do a considerable bit of flipping, turning, and other acrobatic-like maneuvers to get the effect that I like. I suppose that the correct method of carving is doing whatever works best for you.

The picture to the right is the progress made up to this point and the woodspirit faces are now ready for a finish. As you can see I am also putting on a strip of five animal tracks just below the faces which has become the norm for my spirit sticks during the last 5 or 6 years. At this point I only have them sketched out on a portion of the stick that I cleared of bark using the shaving horse, then sanding to a fine finish. The tracks on this series of sticks include bobcat, raccoon, opossum, skunk, mink, beaver, muskrat, coyote, red & grey fox, whitetail deer, and black bear. It takes a lot of focus to paint the tracks onto the stick with black acrylic paint but the end result after a polyurethane glossing is a stunning compliment to the woodspirit face.

I will post the completed sticks just as soon as they're finished. Meantime, have a great Thanksgiving.

Sunday, November 8, 2009

Paint & Finish The Simple Woodspirit Face


Part 1


Part 2


This video will complete the simple woodspirit face that we carved in the previous videos by applying an acrylic finish. Although it appears quite simple, this finishing method took me many years to develop into something that consistently and effectively works for me. Nothing about finishing a carving (or even the carving itself) is in black or white so even with these instructions, set yourself "free" to experiment with different ideas that you might glean from me, someone else, and especially the ideas that will most certainly begin to pop into your own head as you build up more experience. Before long you will most certainly begin to develop your own unique methods of carving, painting, and finishing a carving that work effectively for you.

As always, be safe and have fun!

Thursday, October 29, 2009

The Simple Woodspirit Face- Just The Steps In Brief


I thought that it might be beneficial for some new carvers to have access to a very brief look at just the steps which is a supplement to the two videos posted below on carving a simple woodspirit face. This video is a look at the very learning stick that I've been using for the last couple of years for teaching the kids in my woodshop class and Boy Scout woodcarving classes to try their hands at carving a woodspirit face.

Learning sticks are one of the most powerful tools that I have for teaching in my woodcarving class arsenal. If a new aspiring student can actually "see" with thier eyes and actually "feel" the steps in carving with thier hands, then I have found that their confidence in learning a new skill is greatly enhanced by ten fold.

Although it's not like having an "actual" example of carving in your own hands, it is my sincere hope that these videos will still be of some help to those that want to explore their own hands at carving a face. If you want to learn bad enough then you will surely get to a point where you'll want to move to the next level in carving. Don't give up and just stay with it day after day until something "clicks". If you do that then I can almost guarantee that you will eventually have many carvings that will make you proud. "Just carve!"

Tuesday, October 27, 2009

How To Carve A Simple Woodspirit Face: Part 2


Part 2 of "How To Carve A Simple Woodspirit Face" has been posted. I had to re-shoot one segment that got too messed up but now I'm satisfied and finished it up before this endless rain started. I like to do my videos way out in the woods and sometimes the rain, snow, or cold can put a bit halt on things. Thanks for all the wonderful and inspiring comments on this tutorial from the great folks on the Woodcarving Illustrated Message Board. Those folks are the greatest and have inspired my further carving endeavors since 2004 like no one else has. Thanks gang!

While this particular woodspirit is not exactly an advanced "Pablo Picasso" project, it is focused more on those carvers who would like a great entry level project for trying their hands at carving a face. It's very basic and has been "shop" tested with hundreds of students for more than a decade so I feel confident offering it as such a challenge. If I had only one piece of advice to give a new carver (and only one) I would insist that you carve something every single day. If you find just a few minutes a day then pick up you knife and wood then carve something. It doesn't even have to be a defined project... just carve. Grab a piece of 1" X 1" piece of basswood and just doodle away with your knife. Carve squares, circles, triangles, spirals then invent some of your own designs. That is great practice and you're elevating your carving skills by doing this probably more than you realize. Just carve!

Good luck, have fun, and be safe!

Monday, October 26, 2009

How To Carve A Simple Woodspirit Face: Part 1


I had a lot of fun putting this woodspirit instructional video together yesterday afternoon and I probably spent about 20-25 minutes shooting all the clips. After reviewing them I was amazed that I seemed to be satisfied and that I'd captured most of what I had wanted to say in the least amount of time possible, so I proceeded to "mesh" them all together into two videos that made some kind of sense. YouTube only allows a 10 minute maximum limit so I had to split them into two videos. After uploading the first one I found a flaw in the part 2 video so I'm currently making a correction and will try to get it uploaded later today.

This woodspirit is a great first carving project for the beginning woodcarver and can be considered as an entry-level into faces. I've been using this simple and basic woodspirit face for many years as a teaching tool for helping the students in my woodshop class learn the elements of carving their own. I've been continiously amazed at how so many of my students actually grasp the concept of carving faces as they have produced some wonderful creations of their own over the years. It just takes a lot of practice and a strong desire to "get there".

After presenting some basic information on the different types of cuts most students can use one of my woodspirit learning sticks and do a fairly good job. If you decide to give it a try don't expect to have a masterpiece on the first few attempts. When I first started carving faces in wood I wasn't satisfied until about my 30th one!

Carving faces takes a lot of time, patience, and practice. Study peoples faces while you are at work, at home, or at play and try to understand how all the parts fit together. As I mentioned in the video first carve the nose and the eyes, then base everything else around that and you will be well on your way.

The woodspirit produced in this video was carved from a 1" X 1" piece of basswood. Perhaps in another video I will demonstrate how I carve a woodspirit with more detail such as raised eyebrows, eyes, teeth, tongues, and a variety of emotion and facial expressions. However it is
very important that you first become comfortable with carving this very basic face then you should challenge yourself to the next level. Learning how to finish the face with stain or paint washes is another skill to achieve that is equal by comparison to learning to carve.

In the video I used the "Carvin' Jack" knife made by Flexcut and I just can't say enough good things about it. I'm also planning to do a full review video on it in the near future so please stay tuned.

As always, never-ever compromise your safety. When carving always wear a glove on the non-carving hand and be sure that it's made from a high quality cut resistant material such as Kevlar. If your project isn't clamped or held secure on a table with a vise then be sure to use a lap board to protect your legs. (A piece of 1/2" ply board will work.) Above all be patient and never-ever force your knife. Learn to be safe and carve your project one thin slice at a time until you achieve the correct depth. If you've never had any carving experience then I would strongly suggest that you seek personal instruction from a professional carver and/or study carving manuals such as the Boy Scout Woodcarving merit badge booklet.

Be safe and have fun!

Sunday, October 18, 2009

Bald Headed Woodspirit Walking Stick


Here's another very popular walking stick that I've been carving pretty regularly for about five years now. This type of woodspirit adds a somewhat much fuller "3-D" face that extends around all sides of the stick top. The top few inches of this sourwood stick were slightly twisted and thus added an additional nice
A :en:sweet chestnut forest in the swiss alps(...Image via Wikipedia
look to the woodspirit face.

Carving a more complete face on the top of a walking stick does add an exciting new challenge especially if you're accustomed to the one-sided woodspirit faces. Attempting the the full head will take your carving to the next level so go ahead and give it a try! In doing so I would first suggest that you do a search and study some bald heads and especially look at the rear side where the skull dips back to the inside toward the back and shoulders.

The stick ended up bringing in $44.00 at our annual fundraiser auction in September so the money went to a good cause and I also know that "Baldy" has a new good home for many years to come.

Monday, September 14, 2009

Chainsaw: The "Keebler" Man

Earlier this year I carved a mini woodspirit on a small "Hobbit" sized walking stick at about 13" tall.(See picture below-right) It was mostly just a decorative stick but I really liked the acorn head that I had put on him and it got a lot of compliments. All of this led to last week when I decided to make a big chainsaw carved "Mr. Acorn Head" man out of a pine log that was a bit over 4 feet tall.

As the pictures to the right show, I started on top of the log by first shaping up the acorn, then sketched in a rough outline of the face and then the funnest part (at least to me) of any chainsaw carving... sawing on the beard/hair by texturing with the tip of the chainsaw blade. On a bear or eagle that texture would be the fur or feathers but all of it's done with the side tip of the blade in an almost "buzzing" motion with your wrists.

Adding a word of caution: If you decide to experiment with this method of texturing (or any type of chainsaw carving) I strongly suggest that you first receive professional instruction. I spent 2 weeks in 1995 under close supervised personal chainsaw instruction with professional log home builder Don Chapman from Laurel Fork, Virginia and that has made all the difference. All chainsaw carving can be extremely dangerous if you don't understand how to handle the saw under certain situations because all wood sculpting requires the use of the blades tip which makes the danger of kickback very likely if you're not completely focused on what you're doing. Texturing hair, beard, fur, or feathers requires using the tip of the blade so learn to do it right and never-ever compromise your safety!

I don't have a detail chainsaw with the beloved dime tip so after roughing out the general shape of the spirit I then took it inside the shop to finish up the face with my regular carving tools. The picture to the right is the small 13" acorn-head stick that I carved earlier this year used as a general guide while carving the bigger one.

This was certainly a fun project and I ended up naming him "Keebler" after, of course, the famous cookie making people. Keebler is now looking for a loving home, preferably with kids and lots of pets so that he can be sure to get the kind of love that he deserves!

Wednesday, August 26, 2009

WIP-Part 2 Sourwood Woodspirit

WIP ="work-in-progress"

Finally it is finished! This carving has been sitting proudly overlooking all who entered my shop for several weeks but I have just got back to finish him today. Although I was pleased with the paint job and finish somehow he ended up with just a bit more of a "surprised" look on his face than I intended. But that's ok because that is the look that I'd expect for him to have upon a stranger entering the room like, "Whooooooa... For whom is this entering my room?" After all he was sitting there on that lonely shelf for quite a while so perhaps he should also be evaluated for therapy too! :)

If you'd like to see the first posting on this "work-in-progress" then simply scroll back to August 16th or just click here. Thanks for checking him out!

Sunday, August 16, 2009

WIP-Part 1: Sourwood Woodspirit

WIP= "Work In Progress"

I managed to get this thick-bearded woodspirit mostly carved last week. I picked up a piece of well seasoned sourwood about a foot tall and about 5" in diameter. This chunk of wood had originally been slotted for a bear carving by one of my students but for one reason or another he set it aside... (and I picked it up). I decided to go with the thick fire-flame looking hair and beard which I haven't done in a while. Such beard and hair give the woodspirit such a bold look that can't be found with any other methods of carving it and I've grown to like this particular style.

I probably spent about an hour on it so far and I hope to finish it up this coming week if I can squeeze in a few minutes for painting and finishing. I was thinking about mounting a short red stubby candle on top but haven't decided on that for sure just yet. I'll post a finished picture shortly... that is if it doesn't embarrass me too much! Thank's for taking a look.

Tuesday, July 14, 2009

Carving on the Trail

For the second time in a week I was fortunate enough to help lead a group of 8 kids on the 4.5 mile Stone Mountain loop trail at Stone Mountain State Park in the beautiful northwest North Carolina. The hike is listed as "strenuous" and it's the kind of trail that you want to run as much energy out of the kids as you can. That way they get to sleep on time and sleep hard that night... and that's very important in the life of a child.

We found a secret lunch spot back off the trail a bit that is like something out of Middle Earth with short rock caverns and a sweet rock crevice that the kids can follow around in a fun to explore maze. It's almost a magical place and we love introducing the kids to it about half way through the hike. This is also the spot where we have our first opportunity to do a little carving on the wood found along the trail.

Today Chief Davie, another counselor on the hike, was working on a spoon that he's been carving on carefully just a little bit at a time for a month now. I continued my tradition of carving a very simple woodspirit in found wood to give to a total stranger as a random act of kindness. This is always a great opportunity to teach the kids a good lesson about selfless giving and by choosing a total stranger the life lesson is magnified X 10.

After lunch I found a 6 or 7 year old boy swimming in the cool pool of water at the base of the 200 foot waterfall along the trail. He was thrilled when I offered him my woodspirit stick but he didn't immediately take time to study the carving since most of his attention at the moment was to create as many waves as possible. That's what little kids do.

Our students were full with energy today and we got done with the hike early so we decided to spend about a half hour at the trail head for another carving period as we drank our cola drinks and snacks. In addition to Chief Davie I had 4 of the kids join me for a lesson on how to carve the woodspirit face in the dead found wood they had picked up along the way. During this period I also had time to carve two more woodspirit faces and the kids had a good time too.

My lesson in selflessness paid huge dividends today when at the end of the carving period I set my woodspirits up to be easily found by a stranger on the park bench in the parking area. One of our students, Taylor then had a great idea and asked me if he could personally present them to two elderly ladies who were chatting on a nearby bench. I gave permission and he politely presented them to the ladies. These two ladies were even more thrilled than the children that I had chosen randomly before. These two ladies held them in the air for a close inspection admiring the art and making sure that Taylor received the due respect that he deserved.

Some of our successes today included completing a strenuous 4.5 mile mountain hike, observing and discussing wildlife observations of crawdads, a water snake, frogs, hawks, etc. but my biggest success of the day was when Taylor took the lead and offered his own hand in a random act of kindness. These kind of life lessons are just as important to success as reading, writing , and arithmetic but teaching values seems to be almost forgotten in today's classrooms. We will all sleep well tonight!

Sunday, July 12, 2009

WIP-Part 2: Carving a Mini Greenman

WIP= "Work In Progress"

I have just finished up the little greenman and he's most definitely turned out to be one happy little fellow that I hope will bring many a grin and smile to a lot of observers from the nick-nak shelf. First I must make a BIG correction because I said in my last posting that the wood used for this project was laurel. Not so... It's rhododendron. On a day hike to Stone Mountain State Park this week a friend reminded me of what I knew at one point in my life but I let my knowledge of plants slide to the far side of my brain for several years. I went on another long forest hike yesterday and I'm currently editing the pictures, but when done I will elaborate on the difference between the mountain laurel and rhododendron that's found in my region of the southern Appalachians. Perhaps it will stick with me this time!

Anyhow this has been another fun project and the latest addition to my collection of walking stick scrap characters. This particular greenman has probably been the most detailed of them all which can be credited to those shiny smiling pearly whites. This is also one of the first carving projects where I used my new Flexcut Pelican knives (both the mini and regular sizes) that I discovered and purchased after some research on the Woodcarving Illustrated Message Board. They came in really handy on the hollowed out areas such as in and out of the leave contours. These are two blades that I'm really glad to now have as part of my carving arsenal and they will be called upon on a regular basis now I'm sure.

Okay, it's on to my next project which I'm thinking will be a slingshot. If you look back to my posting on July 3rd I have been re-inspired by Rufus to make my own slingshot. I made several of them about 7 or 8 years ago but unfortunately I didn't take any pictures but I think that I can pull it off fairly easy. I've already ordered the rubber and it arrived this week. This is gonna be one fun project and I can't hardly wait to get started so let me get going........

Sunday, July 5, 2009

WIP-Part 1: Carving a Mini Greenman

WIP= "Work In Progress"

Finally I'm back to working on a new or better yet, a semi-new project since I started it a while back then put it down for almost a year. I make these little faces from the scrap pieces of wood that I cut off of my walking sticks and you can find a whole variety of them that I posted on the Wood Carving Illustrated message board at: Mini-Greenman from walking stick scraps

When completed this little greenman will stand about 4" tall and I'm carving it from a piece of laurel that I cut off one of my walking sticks some time back. So far I've got the face mostly roughed out but there's still going to be a lot of smoothing up those initial cuts but I'll get to that after the enclosing oak leaves are roughed in. Right now I've got the bottom two leaves roughed out and will begin on the top two leaves next. I decided that this little fellow would have a little expression with some teeth to boot. These little carvings are a lot of fun but like anything that is small there must be a lot of attention to the detail and this is the type of carving that I do best when there aren't any distractions around but that's a hard thing to come by in my busy life so this little fellow might take a while to finish up.

Friday, June 12, 2009

A quick black locust woodspirit

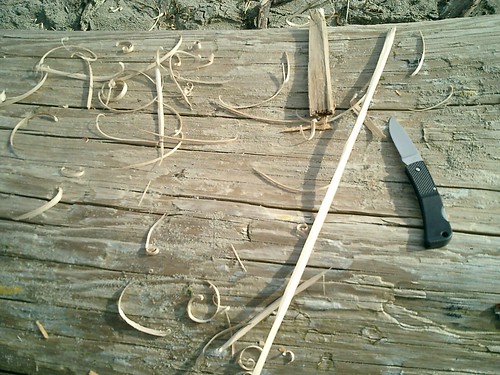
My latest carving project is a very simple and basic woodspirit. So basic it is that I put in squinting eyes. The challenge of this particular project was that the wood was a small 8" piece of very dry and rock hard black locust root wood AND that I carved the entire piece using only a Swiss Army knife. One of the most common statements that I hear from the kids in my carving classes each day is that, "If only I had the blade you're using" so I decided to tackle this little woodspirit project to show what could be achieved with only a basic pocket knife and no specialty tools. It ended up being a lesson that sunk in pretty good with my students teaching them to improve their skills at being more resourseful.

Black locust is a very common tree here in the southern Appalachians and the local farmers actually refer to it as "honey locust" becasue of the beautiful honey colored grain of the wood. Along with eastern red cedar the locals also use split black locust for their fence posts because it has such good weather resistance qualities. Personally I like to use it for firewood because it's so hard and can smolder in the wood heater so well on a cold winters night. I also built a sturdy shaving horse from black locust several years ago and I expect that it will last for my life time and probably a little more.

Carving the black locust was quite the challenge and I spent the last two days working on it here and there. The dry wood was so hard I had to be careful not to break my knife blade, patiently removing one thin sliver of wood at a time until I had a face. It ended up having a nice contrast against the weather ridden wood root which had been blackened from a past forest fire. To finish I only applied one light coat of polyurethane.

Thursday, June 4, 2009

WIP: Part 2-Ladybug walking stick

She's a pretty little bug


I've finally completed this cute little ladybug and for such a small carving she really does stand out atop the stick boasting that coat of orange and black! This is a walking stick that I've had on my mind for a very long time and I'm pleased with how it came out. It's actually a fairly simple thing to carve and I would have to put it in the fairly easy category if teaching a new student to carve one.

If you don't have much carving experience my tips for this project would be to first study as many pictures of the ladybug as you can AND study the real bug in the wild too if you can. As you can see from the pictures that I added to the last posting, sketch out the general rounded body shape on the top of the stick before any carving begins. Most of my new carving students biggest mistake is picking up their piece of wood then they will begin cutting it with their knife with absolutely no sketching, or outline of their project on the wood and then they will wonder why they can't get it right. All good carvers will do at least a rough sketching of their project on the wood first. The next tip that I will recommend is to scribble a general center line if you are carving a 3-D project such as the ladybug. I find that having a center line is essential as a reference point for keeping both sides of the carving in their proper perspective.

For the paint job I used water based acrylics and thinned them down a good bit then, as usual, applied several layers until I reached the tone I wanted. For the base coat I mixed a bright red with a pumpkin orange that seemed to make up the real ladybug color. After painting the legs and spots with black I quickly dried it with my hair dryer then very lightly sanded the finish which I feel highlights the hand carved markings just beautifully. Gosh, I do want it to look like a wood carving and not like the smooth painted finish of a new car.

The next step now will be to carve those green leaves under the ladybug which I believe will contrast well with the bright orange and bring my bug to life. I'll try and get those pictures posted by the weekend. Hope that you like my new little buggy friend!


Tuesday, June 2, 2009

WIP: Part 1-Ladybug walking stick

Last weekend I pulled down a fine red maple stick that's been curing in the shed for more than 5 years so it was well seasoned and begging to be carved. It was one of my smaller sticks measuring 56" tall but only 1" diameter at the top. As more carving years roll off behind me I seem to be carving small things more and more. Perhaps it's an effort to perfect my micro carving skills or since I'm getting older perhaps it's just my attempt to better understand the intricacies of my own life and how I fit into it. Whatever the reason this project is going to be another one of my efforts to better understand carving in the small.

For beginners I knew that I wanted to perch a brightly colored ladybug on the top of my stick and at some point I'd like to do one with a frog ready to jump, but today it will be the sweet little ladybug and I'll have to save the frog for a rainy day. Gosh, who can deny the intrinsic beauty of that rounded coat of orange and black spots? Ladybugs have always captivated my imagination and scientists also say that they are very beneficial to agriculture but they also have a dark side. Each spring they find their way into my old house by the hundreds (possibly thousands?) thus a battle of the bugs begin. I swat them from the ceiling with my broom, spray them in the windows in a desperate effort to control the madness, and occasionally I spit them from my mouth while eating my cereal... but I always get through it and survive another day. Yes, they can be darn pests' also!

If you enlarge the picture above by clicking on it you will better see how I first sketched an outline of the ladybug on the top of my stick with a pencil, then began removing the waste wood with my jack knife using a repeated stop cut and push cut. Right from the beginning there was no doubt that this piece of well seasoned red maple was some kind of hard. Sometimes I love carving into the harder woods because it slows down my cuts to a crawl forcing me to just enjoy the carving process on a higher level and the slower cuts slow down my mistakes giving me more time to contemplate each cut. For some reason I find a deep satisfaction from this kind of carving.

After rounding the body and adding the legs I just lightly sanded the rough carving with a piece of fine grit 220 sandpaper but not too much as I want the beauty of the cut wood to show. Next I will add the finer details of the ladybug and that's where all of the pictures of this beautiful little insect come in handy. I've been collecting pictures of ladybugs for many years and have a nice collection to study so I'll now try and get those wings, eyes, and spots embedded just right. So far I like how it's turning out and I'll post the next update soon which will include the paint work and perhaps I'll add something else to the stick. Maybe a few green leaves would be nice underneath this ladybug? We'll see.