Tuesday, September 29, 2009

Order of the Arrow: "Fall Fellowship"

Lots of stuff goes on at the annual Fall Fellowship weekend of the Order of the Arrow. Boy Scouts and Scouters came together from several northwestern North Carolina counties at my new home away from home Camp Raven Knob for a weekend of fun competition, fellowship, workshop meetings, Lodge elections, lots of good food, and a Saturday night auction.
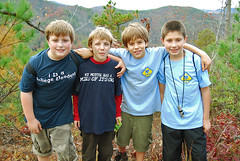
Too bad that it rained steadily all day on Saturday but not even that stopped any event from it's scheduled time. The Scouts who show up for the Fall Fellowship are the best in their troops when it comes to scout spirit. Some of the games started inside but most of the competitive activities such as tug-o-war and erecting a tent were held right in the afternoon rain. The wet, the cold, and even the mud seemed to inspire even more energy from the participants which made it a lot of fun to be there.

While Saturday afternoon was mostly fun and games then followed by chapter meetings, speeches, campaigning and elections, the morning was filled with a lot of workshop choices that included Scoutmaster brainstorming sessions, Elangomat training, and Order of the Arrow history to name just a few. It was a great opportunity to soak in a LOT of wisdom from those who have already traveled this road thus generating only more enthusiasm to learn more.

Saturday night was greatly anticipated from my own point of view because this is when the annual patch auction is held. One of the first patches produced by Camp Raven Knob, circa approximately late 1950's fetched nearly $300.00 and the profits were split between the camp museum and the Lodge. Personally I bid on a 1948 edition of the Boy Scout Handbook and I got it for $20.00!

Also, since my troop works with at-risk youth we don't have a way to raise funds for memberships, rank & merit badges so I donated 5 woodspirit, Indian, etc. walking sticks to the auction to raise money for our troop. They only auctioned off one this night at $40.00 and the remainder will be sold at other upcoming Scouting events. Last year I donated five walking sticks that raised about $250.00 for our treasury.

2009 produced a great Fellowship and everyone left in high spirits.


Future "Arrowmen"

Thursday, September 24, 2009

A Simple Tree Limb Whistle


And yet another video that I've uploaded on making a simple tree limb whistle. This easy project has been very popular with the kids in my woodshop class for almost 15 years. It's super easy to make and a good way to ensure success especially with new students because it's also a quick project that can be making music in less than 20 minutes. After that I like to encourage students to extend the whistle by a lot of sanding, perhaps adding some creative carving, or maybe some woodburning art.

The whistle in my video was made from a scrap of wood that I sawed off from a sourwood walking stick that I recently carved. (Look at the brillant red leaves of the sourwood tree below.) I have a hard time throwing out any good piece of wood so making a whistle is a good way to utilize these scraps. It was about 6" long and about 1-1/2"
almost doneImage by djbones via Flickr
diameter so the 3/4" drill bit worked well. These whistles can also be made from smaller pieces of wood so just scale down the drill bit and experiment until you get it right.

This is an excellent project for a parent/child or Scouts but you might want to set some limits for using the completed project because the constant whistling has been know to cause a few head aches with by-standers. Have fun and always think safety when in the woodshop.

Tuesday, September 22, 2009

Whittling Humorous Country Chickens


I've posted yet another YouTube video about how I make humorous country chickens and roosters from the forked twigs of trees. Several years ago I came across a great book by Chris Lubkemann called, "Whittling Twigs and Branches" Mr. Lubkemann makes many different birds with his pocket knife and twigs from the limbs of trees. Although he makes his tail feathers very skillfully right from the same twig, I've developed another "fool-proof" method for obtaining the feathers by using shavings made on a shaving horse using a drawblade.


Mr. Lubkemann's method is definitely preferred but I've discovered another method which works best when teaching the kids how to do it in my woodshop class. Curling the tail feathers with a pocket knife takes a bit of practice and works best when the twig has obtained just the right amount of moisture. By drying out the twigs and shavings in advance my method is an almost fool-proof way to start making these wonderful roosters right away and kids can have almost guaranteed success in just one class.

Once again, if you don't have Mr. Lubkemann's book then I strongly reccomend adding it to your library He also offers workshops and you can find more information on them at his website: http://www.whittlingwithchris.com/ I've never been fortunate enough to attend but I hear that they're really great!

Sunday, September 20, 2009

Carving An Indian In Sourwood


I put together a new YouTube video on carving an Indian in a chunk of sourwood. Check it out. It sold at yesterdays fundraising auction and now has a good new home.

Thursday, September 17, 2009

Another Indian Walking Stick- (Black Birch)

Sweet Birch Catkins (Male & Female)Image by milesizz via Flickr
Lately I've been on a roll and I'm turning out a LOT of carvings. That's due mainly to two major fund raising auctions that both land in September. The Indian walking stick that is posted to the left is different from the one that I posted on September 11th here but just as nice in my opinionated opinion. (Ha)

On this Indian I put a turquoise and red headband in place which gives it his distinctive Indian appeal. I used a nice piece of sweet birch that I cut less than a year ago so it carved quite nicely. Some folks call it black (or cherry) birch which are also correct.

Within the month it will soon find space for show and tell in a yet to be know home where I hope it can be enjoyed for many years.

Reblog this post [with Zemanta]

Monday, September 14, 2009

Chainsaw: The "Keebler" Man

Earlier this year I carved a mini woodspirit on a small "Hobbit" sized walking stick at about 13" tall.(See picture below-right) It was mostly just a decorative stick but I really liked the acorn head that I had put on him and it got a lot of compliments. All of this led to last week when I decided to make a big chainsaw carved "Mr. Acorn Head" man out of a pine log that was a bit over 4 feet tall.

As the pictures to the right show, I started on top of the log by first shaping up the acorn, then sketched in a rough outline of the face and then the funnest part (at least to me) of any chainsaw carving... sawing on the beard/hair by texturing with the tip of the chainsaw blade. On a bear or eagle that texture would be the fur or feathers but all of it's done with the side tip of the blade in an almost "buzzing" motion with your wrists.

Adding a word of caution: If you decide to experiment with this method of texturing (or any type of chainsaw carving) I strongly suggest that you first receive professional instruction. I spent 2 weeks in 1995 under close supervised personal chainsaw instruction with professional log home builder Don Chapman from Laurel Fork, Virginia and that has made all the difference. All chainsaw carving can be extremely dangerous if you don't understand how to handle the saw under certain situations because all wood sculpting requires the use of the blades tip which makes the danger of kickback very likely if you're not completely focused on what you're doing. Texturing hair, beard, fur, or feathers requires using the tip of the blade so learn to do it right and never-ever compromise your safety!

I don't have a detail chainsaw with the beloved dime tip so after roughing out the general shape of the spirit I then took it inside the shop to finish up the face with my regular carving tools. The picture to the right is the small 13" acorn-head stick that I carved earlier this year used as a general guide while carving the bigger one.

This was certainly a fun project and I ended up naming him "Keebler" after, of course, the famous cookie making people. Keebler is now looking for a loving home, preferably with kids and lots of pets so that he can be sure to get the kind of love that he deserves!

Friday, September 11, 2009

Latest Indian Walking Stick


I just uploaded my latest YouTube video on carving an Indian walking stick. While I don't claim to be a professional face carver, I thought that I'd put together the general steps in how I've come to carve a basic Indian face, hoping that it will inspire a new carver to stick with it until they are satisfied with their own work.

I used a 58" piece of straight sourwood that I cut about six months ago. The stick was very dry but not 100 percent seasoned, leaving just a touch of moisture for MUCH easier and enjoyable carving.

Carving an Indian face presents a very nice challenge since you can't hide details like the mouth and chin as can be done with all the hair & beard on a woodspirit face. For new carvers I would suggest mastering the basic woodspirit face first, then gradually progress to the more challenging details found on the Indian. But if you feel bold or like you're ready for this kind of challenge then by all means, "Go for it". In getting started the basic principle that I always keep in mind is to carve the eyes and nose first, then base everything else around that.


With the carving done I pained him with a variety of mostly watered down acrylic paints but that process would take another video. I put on a final sealer of polyurethane, then drilled a small hole just below the hair for a leather wrist strap. I also carved the name of my Order of the Arrow "Lodge 118" down the front of the stick since it will be auctioned by the Boy Scouts this fall as part of a fundraiser for our troop. Happy carving!

Tuesday, September 8, 2009

Scout Slide # 2: OA Lodge Indian

Carving neckerchief slides is something new to me and something that I've been meaning to get to for many years. Finally the slide bug has bitten hard enough that I'm now hooked on them.

For beginners I really love carving in-the-small so the slides fit the bill for this need. Secondly, they offer an endless opportunity for creativity since just about any idea, far or wide, can work for a slide. Thirdly, I've recently become active in the Order of the Arrow so that leads right into number four... slides are practical in that this is a carving that can be worn to Scouting events.

Anyhow, I just finished my second slide which is an Indian with an eagle head dress. My first slide was a miniature totem pole which I posted on August 31st and can be found here. I decided to personalize it with some additional woodburning
Tipi - American Indian tentImage by Mr Wabu via Flickr
to bring attention to my OA Lodge, Wahissa 118. Perhaps one day when I'm long gone then it will become a collectors item. :)

I carved it from a small piece of basswood the exact size of a Jenga Block which was 1" X 3" X 3/8". I first sketched the pattern onto the wood then cut out the waste wood around the eagle wings with the scroll saw. Next I went on to carve all the detail and my Flexcut mini pelican blade was a pleasure to work with on this small carving. After it was completed I then used my detail woodburner to add the feather texturing on the eagle and the Wahissa lettering. The "118" number was painted on with burnt umber and a very small detailing paint brush. I used watered down acrylic paints for the color and gloss polyurethane for the final finish. Oh yeah, I also cut out and attached the rounded slide on the rear side with wood glue and clamping.

Sunday, September 6, 2009

Profile: Remembering "Annie & The Salesman"

It's been 15 years since my first thru-hike of the Appalachian Trail, Georgia to Maine where I spent 5 months (152 days) on the trail. Reflecting back I now realize that I treasure the people and friends that I met along the way more than anything. Other than a few selected spots along the trail, I can't recall that sunset, that long-range view, or a scenic lake but I do remember the people that I met along the way. The people are what makes a good hike a superb hike.

"Annie & the Salesman" (Larry & Ann McDuff) were two of those special people that I met during my hike and we continued to keep in touch from time to time for several years after our thru-hike. I first met them at a shelter in New Jersey where I finally caught up to them after a chase that lasted for a month. For weeks I had enjoyed reading their meaningful entries at the various trail shelters and I was determined to catch up to them. Perhaps more than anything Larry & Ann were from my own home state of Alabama so they felt like family to me even before I had met them and I just knew that I had to catch them.

So it was, that very late one evening I arrived at that shelter in New Jersey and introduced myself and revealed that I'd been chasing them for a very long time. It was late and the shelter was full so we didn't get to have a long first conversation but I knew now that we'd be bumping into each other for the rest of the way to Maine.

Larry was a retired salesman for IBM in the Mobile area and this was their first thru-hike attempt. They talked proudly of their son whose trail name was "Fairhope" and he had just completed his own thru-hike of the AT in a recent year and now they were here following in his footsteps. Larry & Ann were very down to earth people from the Fairhope, Alabama area on Mobile Bay where they lived a very self-sustaining lifestyle of gardening, bicycling, and soon to be very well known hikers on the Appalachian Trail, Pacific Crest Trail, and the Continental Divide Trail. Both of them talked in a manner and tone that was not in the least intrusive but instead their inquisitive non-threatening conversation made everyone who met them instant friends.

One of the most memorable moments of my thru-hike that I will treasure forever occurred on my birthday, July 2nd at Morgan Stewart Shelter in New York. Once again I had caught up to Larry and Ann at a small store where I walked in and found Ann teared up in a conversation with her children back in Fairhope. Even though Larry wasn't on the phone it was strongly evident that he was very emotionally involved in the conversation as he paced closely to Ann.

After we had re-supplied Larry & Ann caught a ride back to the trail ahead of me and I followed about 45 minutes behind them as I had a need to gobble up a couple pints of ice cream. That evening when I arrived at the shelter I was greeted to a standing chorus of "Happy Birthday" from everyone at the shelter of which Larry & Ann had already befriended. Apparently they had overheard my own conversation on the phone at the store when I had mentioned my birthday.

They secretly sneaked in a big honey bun then planted a big campsite candle right in the middle of it for a birthday cake. Another hiker insisted that I allow him to fill my water bottles at the distant spring since, "You shouldn't have to work this hard on your birthday". In the picture above that is me (second from the right) and Ann is in the center enjoying the show as I blow out that huge candle. Unfortunately Larry wasn't in the picture since he took it.

We continued to share many mutual campsites and trail town hostels all the way into Maine sharing trail stories, future plans, and tales from our Alabama homes. The last time that we crossed paths was in Monsoon, Maine then I took off ahead of them through the 100 Mile Wilderness in an anxious end-of-the-trail hiking fury to reach Mt. Kathadin. We did correspond by mail for quite some time after the hike and the letter to the right is the first one that I received from them in October, 1994. They always wanted me to visit with them at their home but somehow it just never happened.

In the years that followed Larry & Ann became quite a prolific couple in the long-distance hiking community and went on to thru-hike the Colorado Trail, The Pacific Crest Trail and they managed to get half of the Continental Divide Trail completed when during the winter between this hike an unfortunate tragedy occurred back at their Alabama home.

While riding her bicycle Ann was struck and killed by a car on her way to work in their organic garden. Ironically, just two years later in 2004 Larry was also hit and killed by a hit and run driver while out on his bicycle. The world has definitely lost two good people who touched thousands of lives during their years of hiking. The last time that I saw them was at a Trail Days celebration in Damascus, Virginia in 2000. I attended their slide show presentation of their thru-hike of the Pacific Crest Trail (Mexico to Canada) in 1999. I was then planning my own thru-hike of that trail for the next year so it was great to talk with them again.

I will miss their tender and caring spirit, their genuine friendship, and most certainly their refreshing deep southern accent that cured my homesickness during that first long-distance thru-hike when I first met them along the trail in 1994. Annie & the Salesman are together again but there's still a whole lot of people here who dearly miss them and will never-ever forget them. They really made a difference.

Website Fixed

Since I've received several messages about my main website being down for over two months I finally followed the mystery to its source. At first I just thought that it had reached its monthly bandwidth limit... but it still didn't come back after a month.

After de-cyphing the technical jargon from the technicians at Tripod I interpreted it to simply mean that they had changed the WWW addresses of all their old customers like me who've been with them since 1998. The home page would open and "flip" to the new address but all of the links were dead ends. I simply needed to create a new folder in my file manager then put everything in it. Presto! Everything started working right again after a simple 5 minute modification.

Sorry to those who wanted to use the site but it seems to be working fine again now. Just let me know about any dead links and I'll get right on it. By the way, Tripod is a free web hosting server so if you're still using Internet Explorer then you'd better have your pop-up blocker turned on. If you want to navigate sites like this, never seeing a pop-up or not even the flash advertisements then I'd suggest that you install the Foxfire Browser. After installing begin to explore the thousands of add-on's that will personalize and transform the way that you browse the internet. I've been using Firefox for years and can't imagine going back to Explorer. Highly recommend.

Thursday, September 3, 2009

WIP- Part 2 (Final): Chainsaw Carved Bear

WIP= "work-in-progress"

A new member to the family has finally arrived and yes, it's a BEAR! Actually I finished him a couple of days ago but just now barely found time for posting.

He was a lot of fun to carve and like I mentioned in the first posting of August 27th and found here this was my first attempt to chainsaw a bear holding a sign. The process turned out easier than I had expected but I credit that mostly to being prepared since I had already accomplished this task on smaller hand carved bears cut out with the bandsaw. If there was one piece of dominant advice that I could offer to new chainsaw carvers it would have to be this: If you want to carve a BIG "something" then first master carving a small "something".That step alone will increase your chances of success more than any other factor... in my opinion.

Also, this was my first attempt at finishing a chainsaw bear as a "black" bear. I used a can of Rustoleum brand oil paint which is mainly made for metal but it worked absolutely perfect on the wood. It penetrated the wood just great and I was also surprised at how fast it dried. The look of the paint was final and it didn't need any further gloss or sealer. In the case of black bears I can't imagine acrylic paints working better after seeing the results of the oil paint.

This bear turned out just fine in my opinion and I imagine that most of my bears in the future will be black. Thanks for looking!


Wednesday, September 2, 2009

Gigantic Ladybug!

2009 has been the year that the ladybug has joined my arsenal of woodcarving ideas. With their bright orange wings accented with a look of fantasy with those big black spots, ladybugs have always been my favorite insect. It has always amazed me how something so small could be so strikingly beautiful. So far I've carved two ladybug walking sticks and I imagine that now they will always have a place in my carving.

So now I decided to go "gigantic" with my favorite insect thus pulling out the chainsaw and a nice chunk of yellow pine that I've had in storage since last year at this time. As the picture on the left indicates I first sketched out the general outline of the bug on the log with a felt marker, then
FortalezaImage by Gustavo (lu7frb) via Flickr
began to rough it out with the chainsaw. I removed all the bark from the log last year so that the "real" bugs wouldn't have a chance to find a good nesting site thus destroying my future chainsaw sculpting wood. Over the last year the thin outer crust of wood took on a weathered gray look so I buzzed over it quickly with the chainsaw bar to return that fresh wood look.

After doing all that I could with the chainsaw I cut the log in half leaving the final carving at about 20" tall since that particular size would seem best for sitting her on the porch or in the garden. Keeping the log long did make it easier for sculping but now it was time to bring her inside for the final shaping, sanding, and finishing.
A ladybug standing on a leaf. Photograph taken...Image via Wikipedia

Inside I then took my belt sander and rounded up the wings to a smooth finish then took it to an even smoother sheen with the palm sander. I then lightly ran over the exterior log area with the palm sander to give it just a touch of smoothness. I finished up with a coating of "honey brown" oil stain on the log portion then used full strength acrylics for the orange, black, and white colors of the ladybug. A gloss polyurethane on the bug finished it up.

All in all I'm very satisfied with the final carving and I'm sure that it will soon find a nice friendly home where it will crack a big smile on many a face.